12/27/10

Rob's Peanut Patties


My younger sister was the first to be married in my family, and although there are two of us siblings who are older than her and should have been annoyed that she was getting married before us, neither of us were annoyed at all because her husband was just so awesome. My sister and I were living together halfway across the country from the rest of our family when she met her husband and got married, and it wasn't long before his family started inviting me along to all their family holiday events. I always say that when their son got married they not only gained a daughter, but they got two. It was nice for me to feel like I had family around and to join in on their family traditions, and they were always so welcoming and fun. One of those family traditions that my sister and I fell in love with was making peanut patties. Neither of us had heard of them before, and I'm not sure where they originated from. My brother-in-law's grandma on his dad's side used to make them, and it was his aunt that showed us how to make them on his request. They are little pieces of yellow cake that are dipped in a sugar glaze and rolled in chopped peanuts. The end result is just plain delicious. The nuts and the sugar glaze are a great sweet/salty/crunchy layer of goodness and the cake inside is the perfect treat to support such a delicious topping. Like a lot of family recipes, this one didn't have exact amounts written down so I had to wait until I was back together with my sister this week to make these treats again and get some measurements down so I could share them.


To start out with, you need to bake a plain yellow or white cake into either small cupcakes or a sheet cake. You will need to cut the sheet cake into squares, which is traditionally how it was made. More recently the family started using cupcake pans, and my sister even found some square cupcake pans that work great. Let the cake cool completely.


Next, make the glaze, and place it in a large bowl. Chop the Spanish peanuts in a food processor until most pieces are fine. (About 25 pulses.) Place the peanuts in a large bowl.

Dip each cake piece in the glaze, and allow the excess glaze to drip off.


Drop the glazed cake piece in the chopped peanuts and coat with peanuts.


Let harden on a cookie tray or cooling rack for 15 minutes. Place in the refrigerator to let glaze harden completely.


Rob's Peanut Patties

Ingredients:

1 cake mix (yellow or white)
4 cups Spanish peanuts, chopped
2 sticks butter
3 cups powdered sugar
6-7 T milk
2 tsp vanilla

Directions:

1. Make cake mix according to box directions into either 30+ small cupcakes or one sheet cake. Cool completely and cut sheet cake into 2"x2"squares if using.

2. Melt butter and whisk in powdered sugar. Add vanilla and milk, adjusting the amount of milk until the glaze is thick enough to stay on the cake pieces, but thin enough that the excess will run off.

3. Dip each piece of cake in the glaze, allow to drain and drop in chopped peanuts. Cover with peanuts and set aside. Repeat with remaining cake pieces.

4. Let peanut patties harden in refrigerate for at least an hour before serving. Store in the refrigerator or freezer.

Recipe Source: Thank you, Rob

12/23/10

Cranberry Clafoutis

I'm always looking for ways to use fresh cranberries and creme fraiche, so when I found both in a single recipe I knew I had to make it. I had no idea what a clafoutis was, but it turns out it's like flan with fruit in it. I really like how simple this recipe is to make, and how the cranberries really stand out.  I like the balance of the tart cranberries with the sweetness of the flan/custard batter they were baked in. If you like things a bit sweeter you might want to put less cranberries than the recipe calls for because they really are tart.


 Cranberry Clafoutis

Ingredients:
2 cups fresh or frozen cranberries
3/4 cup cranberry juice
4 eggs
1 cup sugar
1/4 cup flour
1/3 cup creme fraiche
1 cup milk
1 T sugar
Creme fraiche

In a medium saucepan over medium heat, simmer cranberries with cranberries 5 minutes. Remove cranberries with slotted spoon; bring remaining liquid to a boil. Boil and stir until liquid is reduced to 1/4 cup. Cool.

Heat oven to 375 degrees. Grease 1 1/2 quart casserole. Beat eggs, 1 cup sugar, flour, 1/3 cup creme fraiche and milk until smooth; stir in cranberry liquid. Arrange cranberries in greased casserole. Pour egg mixture over cranberries; sprinkle 1 T sugar over top. Bake until golden brown and custard is set (45-55 minutes). Serve warm with a dollop of creme fraiche.

Recipe source: The Best of Byerly's: A Recipe Collection


12/22/10

Wassail


For as long as I can remember, my mom has made wassail at Christmas time. Growing up, I remember seeing the big pot sitting on the stove while the spices were simmering and waiting for the time when it was all finished so we could drink it. In my family we all have our favorite ways of drinking it - hot, cold, or by the bucketful in my brother's case. Note that the apple cider in this recipe is actual cider, and not just apple juice labeled as cider. The closest thing I've found on a regular basis is the "Simply Apple" juice. You know you've got a good cider when it's not clear and has a slight tang to its sweetness. This recipe can be adjusted for how sweet or sour you like your drink to be. My mom generally puts in less sugar, and sometimes I leave out a bit of the lemon juice. No matter how it's made, it's one of my favorite holiday food traditions.


Wassail

Ingredients:

1 1/2 cup sugar
4 cups water
2 cinnamon sticks
8 allspice berries
10 whole cloves
4 cups orange juice
2 cups lemon juice
2 quarts apple cider

Directions:

Boil sugar and water 5 minutes. Remove from heat and add spices. Let stand at least 1 hour. (Overnight is not too long). Use a strainer to remove spices and add juice and cider to liquid. Bring to boiling point. Serve.

Recipe source: The Montpelier Ward Cookbook

12/20/10

Wafer Icebox Cake


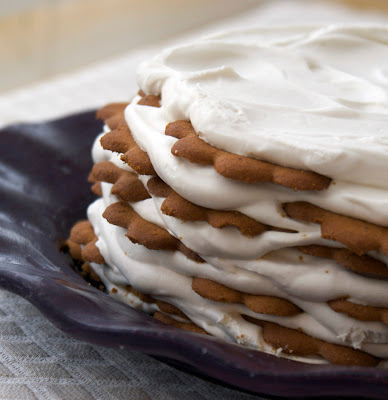
This is probably the easiest dessert ever, but it never fails to get compliments. I remember making it when I was younger with my mom, and I'm pretty sure she remembers making it when she was young with her mom. The classic recipe that comes on the box of Nabisco chocolate wafer cookies says to shape the dessert into a log, but some genius at the Magnolia Bakery decided to make it into a round layered cake which I think is even prettier and just as easy and delicious. It really is as simple as layering cookies, covering them with whipped cream and freezing the whole thing overnight. The cookies become soft and the dessert solidifies into a creamy, delicious cake. Occasionally the Nabisco chocolate wafer cookies can be hard to find, so I've started to use some of the thin Swedish Anna cookies:


I buy them at my regular grocery store, but you can also get them at Ikea along with some clever storage solutions and inexpensive furniture. The advantage of the Anna cookies is that they different flavors, like ginger, which also makes a pretty delicious wafer cake.


Wafer Icebox Cake

Ingredients:

3 cups heavy whipping cream
4 T sugar
1 T vanilla extract (Also add 1/2 tsp mint extract if you want a mint chocolate cake)
2 (5.25 oz) packages Anna's Cookies, or 1.5 pacakges of Nabisco Chocolate Wafer Cookies

Directions:

1. Combine whipping cream with sugar and extract(s) and whip until soft peaks form.

2. On a flat serving plate, arrange 7 cookies side by side in a circle, keeping 1 cookie in the center.

3. Spread with 1/2 cup whipped cream, making a 7-inch circle. Repeat with remaining cookies and cream, ending with a layer of cream.

4. Cover with plastic wrap and refrigerate overnight.

Recipe Source: Adapted from Nabisco and Magnolia Bakery

12/15/10

Pecan Pie Cookies


I'm such a sucker for cookies that are made to taste like other desserts. (Check out this or this if you have any question about that.) In fact, I bought the cookbook that this recipe was in just so I could try it. Luckily, it didn't disappoint. The bottom part of the cookies is rich and buttery, and the layer of toasted pecans in a sweet syrup is just delicious. In fact, I could eat the little pecan/sugar balls that go on top of the cookies by themselves. Well, actually not "could" and more like "did". These are definitely a cookie to make with a friend since they have some time consuming steps, but they make a delicious and pretty cookie for a holiday platter.


Pecan Pie Cookies

Ingredients:

1 cup butter, softened
1/2 cup sugar
1/2 cup dark corn syrup
2 large eggs, separated
2 1/2 cups all-purpose flour
1/4 cup butter
1/2 cup powdered sugar
3 T dark corn syrup
3/4 cup finely chopped pecans

Directions:

1. Beat 1 cup butter and sugar at medium speed with an electric mixer until light and fluffy. Add 1/2 cup corn syrup and egg yolks, beating well. Gradually stir in flour; cover and chill 1 hour.

2. Melt 1/4 cup butter in a heavy saucepan over medium heat; stir in powdered sugar and 2 T corn syrup. Cook, stirring often, until mixture boils. Remove from heat. Stir in pecans; chill 30 minutes. Shape mixture by heaping 1/2 teaspoonfuls into 1/4-inch balls. Flatten slightly and set aside.

3. Preheat oven to 350 degrees. Shape cookie dough into 1-inch balls; place 2 inches apart on baking sheets and flatten slightly. Beat egg whites until foamy; brush on dough balls.

4. Bake at 350 degrees for 6 minutes. Remove from oven and place pecan discs on center of each cookie. Bake 8-10 more minutes, or until lightly browned. Let cool 5 minutes on baking sheets before removing to wire racks to cool completely.

Yield: 4 dozen cookies

Recipe Source: Southern Living Classic Southern Desserts

12/13/10

Lime Glazed Coconut Snowballs


These are my favorite holiday cookie. That's saying a lot because I happen to love most holiday cookies. Actually most cookies. Or any food with sugar in it. Still, when I say these are awesome, I'm not exaggerating. They are a wonderful, buttery soft sugar cookie dipped in a lime glaze and rolled in chopped coconut. It's a fresh, happy combination that is has the bonus of being pretty as well.


Lime Glazed Coconut Snowballs

Ingredients:

2 1/2 cups all-purpose flour
3/4 cup superfine sugar (see note below)
1/4 tsp salt
16 T unsalted butter, cut into 1/2 inch pieces and softened
2 T cream cheese, softened
2 tsp vanilla extract
3 T fresh lime juice
1 T cream cheese, softened
1 1/2 cups powdered sugar
1 1/2 cups sweetened shredded coconut, chopped fine.
Note: If you can't find superfine sugar, simply process 1 cup granulated sugar in a food processor for about 30 seconds, then measure out 3/4 cup for the recipe.

Directions:
1. Whisk the flour, sugar and salt together in a large bowl. Using an electric mixer on medium-low speed, beat the butter into the flour mixture, one piece at a time. Continue to beat the flour-butter mixture until it looks crumbly and slightly wet, 1-2 minutes.

2. Beat in the cream cheese and vanilla until the dough just begins to form large clumps, about 30 seconds. Knead the dough in the bowl by hand a few times until it forms a large cohesive mass.

3. Heat oven to 375 degrees. Working with 1 T of dough at a time, roll the dough into balls and lay on baking sheets, spaced about 1 inch apart.

4. Bake the cookies until light golden brown. about 12 minutes. Let the cookies cool on the baking sheet for 5 minutes before transferring to a wire rack to cool completely.

5. Whisk 2 T of the lime juice and cream cheese together in a medium bowl until smooth. Whisk in the powdered sugar until smooth, adding the remaining lime juice as needed until the glaze is thin enough to spread easily. Dip the tops of each cooled cookie into the glaze, scraping away any excess, then dip into the coconut. Let the glaze dry completely, about 30 minutes, before serving.

Yield: About 3 1/2 dozen cookies
Recipe Source: America's Test Kitchen Family Baking Book.

12/9/10

Gingered Carrot Soup with Creme Fraiche


This is one of my favorite soup recipes. Despite sounding like something at a nice restaurant, and despite looking like something at a nice restaurant, and despite tasting like something at a nice restaurant, it's easy and fast to make at home. I've served it at all kinds of occasions and always get rave reviews. I like that it's a thicker puree, so it's filling and feels more like a meal than an appetizer. Add in the creme fraiche and it's just plain delicious.


Gingered Carrot Soup with Creme Fraiche

2 tablespoons unsalted butter 
1/4 cup extra-virgin olive oil
1 1/2 pounds large carrots, peeled and thinly sliced 
1 large onion, very thinly sliced
1-2 T finely grated fresh ginger (I use 1T)
4 1/2 cups chicken broth
1/4 tsp freshly grated nutmeg
Salt and freshly ground pepper
1/4 cup creme fraiche or sour cream
2 T coarsely chopped cilantro


1. In a medium soup pot, melt the butter in the olive oil. Add the sliced carrots, sliced onion and grated ginger, cover and cook over moderately high heat for about 8 minutes, stirring the vegetables occasionally, until just beginning to soften. Add the vegetable stock and nutmeg to the vegetables and season liberally with salt and pepper. Cover and cook the soup over moderate heat until the carrots and onions are very soft, about 10 minutes.

2. Puree the carrot soup in batches in a blender. Return the carrot soup to the soup pot. Stir in the crème fraîche and chopped cilantro and season the carrot soup with salt and pepper. Serve the soup in shallow bowls.

Recipe Source: Food and Wine Magazine

12/7/10

Creme Fraiche


Creme fraiche is french for "delicious thick creme stuff that tastes amazing." That may not be a direct translation, but it's pretty close in my mind. It's great as a thickener in soups, in sauces, and even just poured over fresh fruit. It has a creamy, slightly sour (but not as much as sour cream), slightly nutty flavor. A small container at the grocery store will cost you your firstborn child (If you can even find it. The creme fraiche, that is. Not your firstborn.) but it's really easy to make your own. So easy, in fact, that you'll soon be looking for excuses to use it. And if you do use it enough, then you'll automatically have all kinds of excuses to hit the gym, too. Win-win.


Creme Fraiche

1 cup heavy whipping creme
2 T cultured buttermilk

Those are the two ingredients. Stir them together in a clean glass jar and cover. Let sit at room temperature for 8-24 hours*, or until thickened. Stir well and store in the refrigerator. The flavor will develop as the mixture ages. Use within 10 days.


*I know, you're thinking that leaving the heavy cream out of the counter for a day is crazy, but you really won't die after eating this stuff. The bacteria in the buttermilk out-compete other bacteria that would make you sick.

12/5/10

Cafe Cravings Dream Bars


Here in Minnesota we have this adorable little cafe called Cafe Cravings and let me just tell you that it is positively sinful!! Every treat I've ever ordered from there is incredibly rich and decadent and pretty much Heaven! But by far my favorite treat is what they call their dream bar but what it really is is a revel bar that has taken some steroids and some major flavor enhancers. In other words it isn't your typical revel bar, but what you'd dream of if you could make it a little better. ;o) So I used my mom's recipe and just doctored it up a bit. After a few tries I came up with what tastes exactly like the Cafe Cravings' version. It is a DREAM!!

Cafe Cravings Dream Bars

3 cups Quick Cooking Oats
2 1/2 cups A.P. Flour
1 teaspoon Baking Soda
1 teaspoon Salt
1 cup Butter
2 cups Brown Sugar
2 Eggs
4 teaspoons Vanilla
1 can Sweetened Condensed Milk
1 1/2 cups Chocolate Chips, semi-sweet
2 tablespoons Butter
1/2 teaspoon Salt
1/2 cup Walnuts, chopped

1. Heat oven to 350 degrees.
2. Combine 1 cup of butter and 2 cups of brown sugar. Beat until light and fluffy then add the eggs and 2 teaspoons of the vanilla.
3. In a separate bowl, combine oats, flour, baking soda, and salt.
4. Add dry ingredients to wet ingredients, mix well.
5. Press 2/3 of the mixture into a greased 9x13 pan.
6. In a medium saucepan, heat the milk, chocolate chips, 2 tablespoons of butter, and 1/2 teaspoon of salt. Once this is melted, take off heat and add the walnuts and 2 teaspoons of vanilla.
7. Pour over the pressed crust.
8. Dot the chocolate with the remaining 1/3 cookie batter.
9. Bake at 350 for 25 minutes. **Do not over cook--they will dry up and be *yuck*!!

**Over the Holidays I was making this and my oldest brother offered an idea which rocked my world..and the Dream Bars! Drizzle 3/4 caramel over the top before you bake it for a less messy bar OR if you want to drizzle it right after you take them out of the oven--either way WONDERFUL!!**


mail.jpg

12/1/10

Ricotta Strawberry Breakfast Panini

These are the sweet cousins of the sausage breakfast paninis, and I think I might like them even more than the savory ones. Pound cake tastes delicious when lightly toasted, and the ricotta and strawberry filling is rich but not overly sweet. I've made these with store-bought pound cake and homemade pound cake, and not surprisingly the homemade pound cake was much better. The store-bought pound cake tasted good, but was more delicate and had a weird aftertaste. You could use the pound cake recipe from this site, but I would suggest leaving out the nutmeg since it is overly strong when toasted.


Ricotta Strawberry Breakfast Paninis

1 cup ricotta cheese
2 T cream cheese, softened
1-2 T powdered sugar, depending on how sweet you want the filling
1 egg white (or 1 T egg beaters)
1 loaf pound cake
1/2 pound strawberries, cut into small pieces
Whipped cream for topping (optional)

1. In a small bowl, combine cream cheese, ricotta cheese, powdered sugar and egg white until well-combined. Refrigerate at least 30 minutes to firm up filling. (Don't skip this step or the filling will just come oozing out the sides of the panini instead of staying inside.)

2. Slice pound cake into 1/2 inch pieces. Heat panini maker and butter one side of each piece of pound cake. Spoon 2 T of chilled filling onto a slice of pound cake, top with 1 T chopped strawberries and top with another piece of pound cake, butter side out. 

3. Working with two sandwiches at a time, place in the panini maker and let cook until the outside of the pound cake is golden brown and the sandwich is hot through. Remove from panini pan, top with whipped cream, if using, and serve immediately. 

 
Pin It button on image hover