Showing posts with label Side Dish. Show all posts

10/27/14

Potatoes O'Brien


This is my favorite potato dish. More than mashed or smashed or scalloped or baked or any other way to make potatoes, this simple little hash is my first choice. It is a mixture of perfectly tender, but not mushy, potatoes, sweet and soft bell peppers, delicious onions and just enough Worcestershire sauce to make you wonder what that great seasoning is over it all. It may seem like a lot of chopping at first, but I promise that is the hardest part of making it. And there is no peeling required, which is good because peeling potatoes ranks at the bottom of my list of cooking tasks I like to do. The hash works great as a breakfast or lunch dish, but equally well as a dinner or side dish. Try it once and you'll be looking for excuses to make it again and again and again.


Potatoes O'Brien

Heat Oven To 350 Published 10/27/2014
Potatoes O'Brien

Ingredients

  • 2 tablespoons vegetable oil
  • 1 1/2 pounds red potatoes chopped in 1/2 inch pieces (No substitutions here. Other potato varieties will break down and get mushy during cooking in this recipe)
  • 1 onion, chopped
  • 2 bell peppers, your color choice, chopped in 1/2 inch pieces
  • 1/2 cup low sodium chicken broth
  • 2 teaspoons Worcestershire sauce
  • salt and pepper
  • 4 green onions, sliced thin

Instructions

  1. Heat the oil in a large skillet over medium heat. Add potatoes, onion and peppers and toss to coat with the oil.
  2. Stir in the broth, Worcestershire sauce and 1 1/2 teaspoons salt. Cover the skillet and let cook, stirring occasionally, until potatoes are tender, about 15 minutes.
  3. Remove the lid from the skillet and cook, stirring occasionally, until the liquid has evaporated and potatoes are starting to brown, 12-15 minutes. Season with salt and pepper to taste and top with green onions before serving.
Yield: 4 servings
Prep Time:10 mins.
Cook time: 35 mins.
Total time: 45 mins.
Recipe Source: Cook's Country

5/27/14

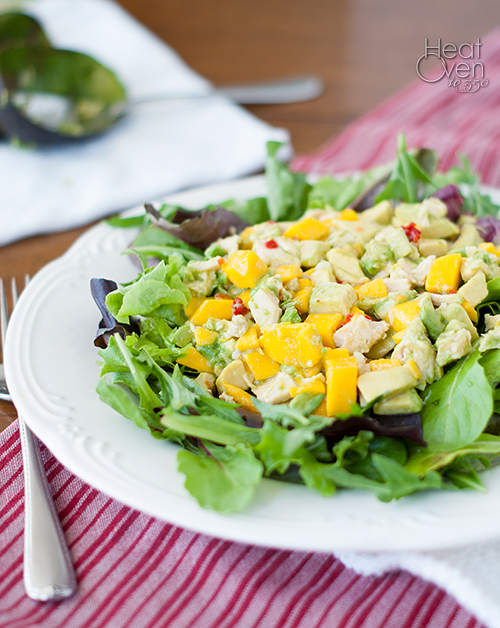
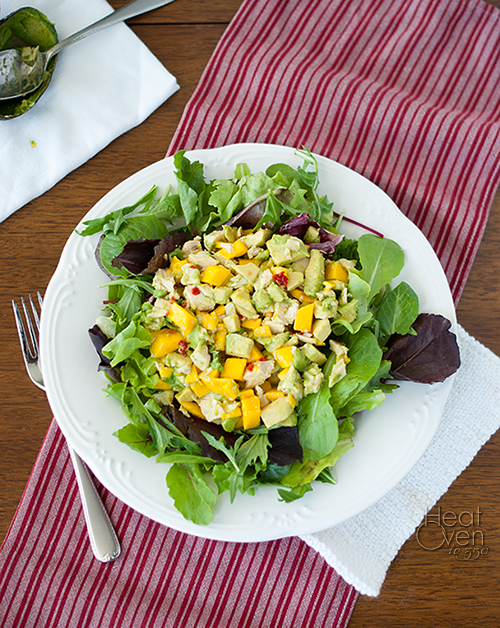
Mango Chicken Avocado Salad


Mango and avocado make one of my favorite flavor combinations. There is something tropical and refreshing about it. With spring greens and chicken in a salad that refreshing flavor becomes an entire meal. A happy, tropical vacation meal. Especially when add on the simple tangy/sweet/spicy lime dressing. This salad says "summer" and "relaxing by the pool"and all kinds of wonderfully sunny things. It is light, healthy, and filling, and easy to make and it makes a perfect lunch or light dinner. Throw it together, eat it outside on the porch, and enjoy that summer is here. 


Mango Chicken Avocado Salad

Heat Oven To 350 Published 05/27/2014
Mango Chicken Avocado Salad

Ingredients

  • 2 tablespoons brown sugar
  • 1/4 cup water
  • 1/3 cup lime juice
  • 3/4 teaspoon chili garlic sauce
  • 4 cups shredded, cooked chicken
  • 2 medium mangos, peeled, seeded and diced
  • 2 medium avocados, pitted and diced
  • 1 (10 ounce) package spring lettuce mix

Instructions

  1. In a microwave safe bowl, combine brown sugar and water and microwave 1 minute. Stir until sugar is dissolved (microwaving more if necessary) and stir in lime juice and garlic sauce. (If you can make the dressing a day or at least a couple hours ahead of time it is even better.)
  2. In a large bowl, gently toss together the chicken, mango and avocado. Add 2 tablespoons of the lime dressing and mix.
  3. Divide the lettuce among four plates, then top with chicken mixture. Pour dressing to taste over each plate and serve.
Yield: 4 servings
Prep Time:10 mins.
Cook time:2 mins.
Total time: 12 mins.
Recipe Source: Adapted from allrecipes.com

5/20/14

Apple Pie Quinoa Salad


I love apple pie. The tart apples, the hint of cinnamon and nutmeg, the sweet juices that come out when you cut a slice . . . is there a more homey dessert? I'm also a big fan of repurposing leftover ingredients and finding healthier ways to enjoy my favorite food flavors. That's where this apple pie quinoa salad comes in. It uses leftover quinoa. It has the same cinnamon goodness, the same deliciously sweet-tart juices and the best part? It is fast and easy. You can enjoy apple pie flavor in less than ten minutes. I originally made up this salad as a snack for my daughter and put it together during a nap time one day. After sampling a few (maybe more than just a few) bites I decided I should really also see how it tasted cold (in the name of research) and put the rest in the fridge. After discovering that it tasted great cold, I thought I should really see how good it tasted the next day. And after learning that it tasted great the next day, there wasn't much left so I just polished that whole thing off. My daughter had to wait until the next batch (which I doubled) to finally try it. Sometimes being the mom has its perks. Whether you want to share it or not, this is a great fruit salad with apple pie flavor and a healthy amount of protein and vitamins to boot. We are big quinoa fans at our house so this is perfect for us, but if you like another grain or have something different leftover you could sub it in for the quinoa. 


Apple Pie Quinoa Salad

Heat Oven To 350 Published 05/20/2014
Apple Pie Quinoa Salad

Ingredients

  • 1 pound Granny Smith apples (about two large; you can use other types of apples but may need to adjust cooking times and ingredients slightly since other varieties soften faster and release more liquid during cooking)
  • 2 tablespoons sugar
  • 1/2 teaspoon cinnamon
  • 1/8 teaspoon nutmeg
  • 1/8 teaspoon ground ginger
  • pinch salt
  • 1 1/2 cups cooked quinoa
  • 2 tablespoons sweetened dried cranberries
  • lemon juice (optional)

Instructions

  1. Peel and core apples and cut into thin slices. Place in a microwave safe bowl and toss with the sugar, cinnamon, nutmeg and ginger.
  2. Microwave apple mixture for two minutes, stir and microwave an additional 2-4 minutes or until apples are starting to soften and release juices.
  3. Pour off juices into a bowl or mug and reserve. Stir in quinoa and cranberries and add juices back until the salad is desired sweetness and consistency. Add lemon juice if desired and serve.
Yield: 4 servings
Prep Time: 05 mins.
Cook time: 05 mins.
Total time: 10 mins.
Recipe Source: Heat Oven To 350

5/13/14

Wild Rice Salad


I love love wild rice, but even if I were on the fence about it, this salad would make me a believer. It. is. so. good. The nutty flavor of the wild rice and edamame, the sweet dried cranberries and carrots, the green onions, the tangy/sweet sesame dressing - it is all so good together. The combination of textures is great too, from the slightly chewy texture of the wild rice to the crunch of the carrots and sesame seeds. If you've never cooked wild rice before, this would be a great way to try it out since this salad does a wonderful job highlighting its best characteristics. And unlike many other wild rice recipes, this one is healthy to boot. I am always looking for great salads that I can bring to summer potlucks, and I'm already calling this one is the winner of the summer. Until the next potluck, I'm making this for myself and hogging all of it, enjoying it as my lunch or as a side at dinner and loving every bite.


Wild Rice and Edamame Salad

Heat Oven To 350 Published 05/12/2014
Wild Rice and Edamame Salad

Ingredients

  • 1/2 cup blanched slivered almonds
  • 2 tablespoons sesame seeds
  • 4 cups cooked wild rice
  • 3 medium green onions, thinly sliced
  • 2 cups shelled cooked edamame (thawed if frozen)
  • 2 medium carrots, peeled and diced small
  • 1/2 cup dried cranberries
  • 3 tablespoons olive oil
  • 1 tablespoon toasted sesame oil
  • 1/4 cup rice wine vinegar
  • 2 teaspoons honey
  • kosher salt
  • freshly ground black pepper

Instructions

  1. Place a medium skillet over medium heat and add almonds. Cook, stirring frequently, until almonds are lightly browned, about 6-7 minutes. Add almonds to a bowl to cool and return skillet to the stove. Add sesame seeds and cook and stir until lightly browned, about 2 minutes. Add toasted sesame seeds to bowl with the almonds.
  2. Add cooked rice, edamame, carrots and cranberries to the bowl with the almonds and sesame seeds. Toss to combine.
  3. In a small bowl, whisk together olive oil, sesame oil, vinegar, honey and a couple generous pinches kosher salt and black pepper. Add more salt to taste, then pour over wild rice mixture and toss to combine. Season to taste with additional salt and vinegar if necessary.
  4. Cover bowl and chill salad at least one hour before serving.
Yield: 6-8 servings
Prep Time: 25 min
Cook time: 1 hour (chilling time)
Recipe Source: Chow.com

5/7/14

Cheesy Quinoa and Broccoli

Mother's Day is this coming Sunday, and to celebrate I'm posting kid friendly recipes all week. I may be alone in this, but sometimes I have trouble figuring out different healthy(ish) options to serve my toddler, especially easy lunch recipes, and my idea of celebrating mothers is to have five new easy recipe options. Happy Mother's Day!


This is one of my favorite ways to serve quinoa. It is so easy, but tastes so good. I've found that even people who generally don't like quinoa tend to enjoy this dish. How can you go wrong when you cover it with cheese? It is so easy it seems like there must be a catch. Like maybe it isn't as good as I'm proclaiming. Trust me, it is. And trust me, it really is as easy as cooking the quinoa and broccoli and stirring in some cheese. Really. The classic flavors of cheddar and broccoli are perfect with quinoa as the base, and quinoa and broccoli cooked in broth are flavorful and delicious and only need the addition of some melted cheese to complete the meal. What I love about serving this to my daughter is that the cheese holds the quinoa together, making it easier for her to feed herself without thousands of little quinoa seeds ending up on the floor the way they do with most quinoa dishes. (Thousands may be an exaggeration, but it doesn't feel like that when you are sweeping them up.) This makes an easy lunch, dinner, or great side dish. If you've been on the fence about quinoa or have heard the hype but haven't given it a try, this recipe would be a great place to start.


Cheesy Quinoa and Broccoli

Heat Oven To 350 Published 05/07/2014
Cheesy Quinoa and Broccoli

Ingredients

  • 1 cup quinoa, rinsed
  • 2 cups chicken or vegetable broth
  • 2 cups chopped fresh broccoli
  • 1 cup shredded Cheddar cheese
  • salt

Instructions

  1. Add quinoa and 1 3/4 cup broth to a saucepan and bring to a boil over high heat. Reduce heat to low, cover, and simmer 10 minutes.
  2. Stir broccoli into quinoa, adding additional 1/4 cup broth if all broth has been absorbed already, and simmer broccoli and quinoa an additional 5-7 minutes or until broth is absorbed and quinoa is tender.
  3. Remove pan from heat and immediately stir in Cheddar cheese. Cover and let sit 2-3 minutes for cheese to melt. Stir melted cheese into quinoa and season with salt. Serve.
Yield: 4 cups
Prep Time:1 mins.
Cook time:20 mins.
Total time: 21 mins.
Recipe Source: adapted from all recipes.com

3/11/14

Cauliflower Couscous


It seems like there is nothing cauliflower can't do. With its mild flavor and versatility in preparation, it is has become a favorite substitute for carby foods like bread, rice, pasta, potatoes . . . you name it, cauliflower has been substituted in it.

Substitutions can either hit the mark or just make you miss the original ingredient, but in the case of this recipe, the cauliflower substitute is every bit as good as the original. Maybe even better. The cauliflower florets are chopped finely in the food processor, giving them a light texture like couscous, and then browned in a skillet until they develop a sweet, nutty flavor. Throw in some classic couscous ingredients, like kalamata olives, garlic, lemon and parsley and you've got a cauliflower dish that is light, fluffy and delicious. And hard to stop eating. I feel like every time I discover a great cauliflower dish I feel like it is my new favorite, and this one is no exception. Whether you want a healthy alternative to regular couscous or just a great-tasting side dish, this recipe deserves a try. 


Cauliflower Couscous

Heat Oven To 350 Published 03/11/2014
Cauliflower Couscous

Ingredients

  • 1 large head cauliflower, cut into florets
  • 2 tablespoons olive oil
  • 1 small onion, diced
  • 2 cloves garlic, minced
  • 1/3 cup kalamata olives, chopped fine
  • 2 tablespoons minced fresh parsley
  • zest of 1/2 a lemon
  • salt to taste

Instructions

  1. Working in two batches, add cauliflower to a food processor and pulse until chopped into very fine pieces, about the size of couscous.
  2. Heat a 12" skillet over medium heat and add olive oil. Stir in onion and garlic and cook and stir 2 minutes.
  3. Add finely chopped cauliflower pieces to skillet and stir to combine. Cook over medium-low heat for 40 minutes, stirring every five minutes or so to prevent burning.
  4. Once cauliflower is golden and developing a nutty flavor, remove skillet from heat and stir in kalamata olives, parsley and lemon zest. Season to taste with salt if needed and serve.
Yield: 4-6 servings
Prep Time: 10 min
Cook time: 45 min

Recipe Source: adapted from allrecipes.com

11/21/13

Cranberry Orange Relish


Cranberry relish, where have you been all my life? How could I have not known about you until now? I knew about canned cranberry sauce, and homemade cranberry sauce, but a no-cook cranberry side dish that is even better than either of these options? I feel like I've been cheated that I'm only finding out about this now. Thankfully, a sweet reader fixed this sad omission in my life when she sent me this recipe last week along with a few other family favorites. I was so intrigued by such an easy cranberry recipe I think I went to the grocery store for cranberries that very day. It seemed too easy to be good, but it is, my friends, oh it is. It is packed with orange and cranberry flavor, not too sweet, and perfect to serve with turkey or any other meat. I will admit that I occasionally sneak a spoonful of the stuff out of the bowl in the fridge and eat it plain. It is easily adaptable to your tastes - you can add more sugar if you want more sweetness or cut back on the orange zest if you want less orange flavor. Plus it is one of those dishes that tastes even better after sitting in the fridge for a day so it easy to have made up before the chaos of Thanksgiving arrives. 

Once the Thanksgiving turkey is gone, there are still plenty of ways to use the rest of the cranberry relish. (Or to have an excuse to make a new batch.) You can use it as a spread on sandwiches, bake into a quick bread, waffles or pancakes, use it as the fruit layer in an upside down cake, heap some on your yogurt or toast, top off a baked brie with it, or just sneak spoonfuls out of the fridge like I do until it all seems to disappear. I'm thinking this relish will be the best five minutes I spend on a Thanksgiving side dish this year. 


Cranberry Orange Relish

Heat Oven To 350 Published 11/21/2013
Cranberry Orange Relish

Ingredients

  • 1 bag fresh cranberries (12 oz, about 3 cups)
  • 1 navel orange
  • 1/2 cup sugar

Instructions

  1. Add cranberries to a food processor or blender. Zest the orange and add the zest to the food processor, then quarter the orange and remove the rind. Add the orange quarters and sugar to the food processor.
  2. Pulse the ingredients together until finely chopped. Taste and add additional sugar according to your tastes. (I like mine a little sour.) Transfer to a bowl and refrigerate (preferably overnight) until ready to use. 
Yield: about 3 1/2 cups
Prep Time: 5 min
Cook time: none
Recipe Source: adapted very slightly from a reader, Pamela S.

11/18/13

Roasted Squash with Maple Syrup and Almonds


True confession - sometimes I don't even serve myself turkey on Thanksgiving. Yes, I know it is the centerpiece of the meal, but to me it seems to take up space that could be occupied by the sides. And oh, Thanksgiving has great sides. I have my favorites (stuffing, ooooh, stuffing how I love you) but I always like to try a new dish or two because you never know what could be a new classic. And this roasted squash dish is definitely a new classic.

Let's talk about roasting for a second, and the magical things it does for squash. Roasting is hands-free and gives squash a sweet flavor with a caramel-like hint. Win-win on both those accounts. In this dish there are three types of veggies roasted together - two types of squashes for slight differences in flavor/texture/sweetness, and parsnips for a little kick. For those of you who haven't tried parsnips yet, go do it. The best way I can describe them is like carrots with attitude. They have a sweet/peppery flavor that adds so much to this dish. (Just be sure to cut out most of the woody cores that some of the very large parsnips have.) The squash and parsnips are tossed in a butter/maple sauce giving them extra sweetness and rosemary is added to the mix to add more flavor. The almonds on top add more flavor and some great texture. I definitely wouldn't skip adding them. In all this small list of ingredients adds up to a seriously delicious side dish. Most of the time to prepare this dish is spent up front doing some serious chopping so it is a good dish to make ahead of time. If you are looking for a new squash dish for your Thanksgiving meal this year, this one is bound to be a hit. 


Roasted Squash with Maple Syrup and Almonds

Heat Oven To 350 Published 11/18/2013
Roasted Squash with Maple Syrup and Almonds

Ingredients

  • 4 cups 1/2 inch cubes peeled kabocha squash (about 1 medium squash)
  • 4 cups 1/2 inch cubes peeled butternut squash (about 1/2 medium/large squash)
  • 2 cups 1/4 to 1/3 inch peeled parsnips (about 2 lbs)
  • 5 tablespoons unsalted butter
  • 1/4 cup plus 2 tablespoons pure maple syrup
  • 2 garlic cloves, minced
  • 3/4 teaspoon crushed dried rosemary
  • 1 1/4 teaspoons salt
  • 1/2 teaspoon freshly ground black pepper
  • 3/4 cup coarsely chopped almonds

Instructions

  1. Butter a 9x13 baking dish and add squash and parsnips. In a small saucepan over medium heat, melt the butter and whisk in the maple syrup, garlic cloves, rosemary, salt and black pepper. Add to the squash in the pan and toss to coat. (The dish can be made ahead to this point and chilled up to a day. Bring to room temp before continuing)
  2. Heat oven to 375 degrees. Cover the baking dish with foil and bake 40 minutes. Uncover and bake until the squash is tender, another 10-20 minutes longer. (if you cut your pieces larger than 1/2 inch cubes you might want to cook the dish even longer.) Sprinkle with almonds and bake another 10 minutes. Serve.
Yield: 8 servings
Prep Time: 45 min
Cook time: 1 hour

Recipe Source: Bon Appetit 2008, via epicurious

10/21/13

Chili Lime Taco Pasta Salad


This pasta salad has been floating around the internet for a while now and every time I ran across the recipe I would bookmark it for future occasions because it looks so good and always got rave reviews. That occasion finally came when I needed a fast, easy dinner with plenty of leftovers for lunches because of a busy week ahead. Yes, it's always a gamble trying a new recipe when you know a flop means you're eating sandwiches for dinner and dreading lunch for the next few days, but in this case it turned out beautifully. Dinner was quick, easy, and the salad was every bit as good as it had been hyped up to be. I loved the sweetness of the corn and the slight kick from the salsa. The lime and cumin are wonderful together, and the creamy avocado is, well, creamy avocado. Need I say more about that? There is a great balance of flavors and textures and, being meatless, it was very quick and cheap, too. Yes, this time of year is all about pumpkin flavored treats and soups, but if your taste buds need a change of pace I would definitely recommend putting this in the meal rotation. 


Chili Lime Taco Pasta Salad

Heat Oven To 350 Published 10/21/2013
Taco Pasta Salad

Ingredients

  • 1 pound farfalle pasta
  • 1 can black beans, drained and rinsed
  • 1 10 oz package frozen corn
  • 1 cup cherry tomatoes, halved
  • 8 oz shredded Fiesta blend cheese (Or mix of monterey jack and cheddar cheeses)
  • 1 1/2 cups salsa
  • 1/2 cup olive oil
  • 4 tablespoons lime juice
  • 1 tablespoon cumin
  • 1 1/2 teaspoons chili powder
  • 2 garlic cloves, minced
  • salt and pepper
  • 1/2 cup chopped fresh cilantro
  • 2 avocados, diced

Instructions

  1. Cook the pasta according to package directions and rinse under cold water until cooled.
  2. While pasta is cooking, combine black beans, corn, tomatoes, salsa and cheese in a large bowl.
  3. In a medium bowl, whisk together olive oil, lime juice, garlic, cumin, chili powder and cilantro. Pour over corn mixture and stir to combine. When pasta has cooled, add to the bowl and mix well. Season to taste with salt and pepper.
  4. Just before serving, gently stir in diced avocado.
Yield: 6-8 servings
Prep Time: 10 min
Cook time: 12 min
Recipe Source: adapted slightly from a recipe I've seen in a couple places, including Cara's Cravings and The Sweet's Life


9/24/13

Guest Post - Spaghetti Squash with Apples


Bonus recipe this week! Hop on over to my friends Britney and Cherie's site to see my guest post today. It's spaghetti squash tossed with a mustard dressing and apples, cranberries and roasted pumpkin seeds. It's crazy good and screams autumn. Can you tell I'm ready for the cooler weather?

9/5/13

Quinoa Salad with Red Pepper and Cilantro


While I rarely turn down a quinoa salad, there are few quinoa salads that I crave. Salads that I finish off and wish for more. Quinoa salads that make me excited (more that usual) for lunch. Quinoa salads that I would still eat even if they weren't healthy for me to boot. One of those such salads resides in the fabulous salad bar at the bistro near work. Although I've made it my personal quest to recreate said salad, so far I've come close but still need to work on the recipe a bit. Luckily for me, there is another quinoa salad that is just as good and it is the one I'm sharing today. There are so many things I love about it. The mustard dressing, for one. It's perfect. It's the perfect amount of tangy, spicy and mustardy. For two, there are the red bell pepper pieces. They add the perfect amount of crunch and flavor without trying to overpower the quinoa. Then there is the cilantro, which is a love, and of course, the fluffy texture of the quinoa. The only drawback of this salad is that it really doesn't make enough. I always finish it wishing I had doubled the recipe so there would be more because it makes the perfect lunch or side dish. If you are looking for a quinoa salad that you will crave, give this one a try.


Quinoa Salad with Red Pepper and Cilantro

Heat Oven To 350 Published 09/05/2013
Quinoa Salad with Red Pepper and Cilantro

Ingredients

  • 1 cup quinoa, rinsed and drained
  • 1 1/2 cups water
  • salt and pepper
  • 1/2 red bell peppers, stemmed, seeded and chopped fine
  • 1/2 jalapeno pepper, stemmed, seeded and minced
  • 2 tablespoons minced green onion
  • 1 tablespoon minced fresh cilantro
  • 2 tablespoons fresh lime juice
  • 1 tablespoon extra virgin olive oil
  • 2 teaspoons Dijon mustard
  • 1 small garlic clove, minced
  • 1/2 teaspoon ground cumin

Instructions

  1. In a medium saucepan, combine quinoa and water with 1/4 teaspoon salt. Bring to a boil, reduce heat and simmer, covered, until quinoa has absorbed most of the water, about 12 minutes. Remove from heat and let sit covered for 5 minutes. Spread quinoa on a baking sheet to cool, about 20 minutes. (Or make the quinoa ahead and cool in the fridge until you are ready to use it.)
  2. Transfer cooled quinoa to a large bowl. Stir in the bell pepper, jalapeno, onion and cilantro. Whisk the lime juice, oil, mustard, garlic, and cumin together in a small bowl and pour over quinoa mixture. Toss mixture to coat quinoa evenly. Season with salt and pepper to taste. Serve.
Yield: 4 servings
Prep Time:15 min
Cook time: 32 min
Recipe Source: adapted slightly from the America's Test Kitchen Healthy Family Cookbook

8/19/13

Sautéed Zucchini Shreds with Herbed Greek Yogurt


I'm not that proud of it, but I fought with my one year over eating this zucchini. Twice. And not the Eat-your-veggies-you-can't-live-off-goldfish-crackers fight. It was more like a Please-stop-eating-all-the-zucchini-and-save-some-for-mom type of battle. This recipe just doesn't seem to make enough to satisfy the two of us, so by the time the last bits of delicious zucchini are being scraped from the pan I'm trying to distract my daughter with string cheese and various fruit so I can enjoy the last few bites myself. There are far worse predicaments to be in, but let me just warn you in advance that you might want to double this dish. 

This is such a simple, yet delicious way to enjoy zucchini. You shred the zucchini on a box grater, toss it with some salt, and let it sit in a colander for half an hour to pull some of the extra moisture out. Then you lightly press out more water and saute it with a tiny bit of olive oil, garlic and some pepper. The zucchini comes out tender and buttery, which is amazing considering there is no butter in the dish. It is delicious just like this, but when you add some herbed Greek yogurt on top to add some refreshing coolness it becomes outstanding. Seriously. Zucchini. I'm not even kidding when I say I crave this dish. It is by far the simplest, healthiest and most delicious way I've found to eat zucchini. Get yourself to your garden, your neighbor's garden, or your farmers market for some zucchini ASAP and try it out for yourself. 

And trust me, you will want to double it if you are sharing. 


Sautéed Zucchini Shreds with Herbed Greek Yogurt

Heat Oven To 350 Published 08/18/2013
Sautéed Zucchini Shreds with Herbed Greek Yogurt

Ingredients

  • 1 pound zucchini (about 3 medium zucchini)
  • 1/2 teaspoon salt, plus more to taste
  • 1/2 cup plain Greek yogurt (I've used both 0% and 2% fat Chobani and both work fine)
  • 1/2 clove (about 1/4 teaspoon) minced garlic
  • 1 teaspoon finely minced green onion
  • 1/4 teaspoon dried dill weed
  • 1/2 teaspoon lemon juice
  • big pinch kosher salt
  • 2 teaspoon olive oil
  • 1 garlic clove, finely chopped
  • freshly ground pepper to taste

Instructions

  1. Cut off the ends of the zucchini and grate over the coarse side of a box grater to get shreds. Transfer shreds to a colander, toss with 1/2 teaspoon salt, and let stand over the sink or a plate for 30 minutes. Press the zucchini shreds against the side of the colander with your hands, squeezing out excess liquid. Transfer zucchini to several layers of paper towels and pat dry.
  2. In a small bowl, stir together the Greek yogurt, garlic, green onion, dill weed, lemon juice and kosher salt. Add more salt to taste and refrigerate the mixture.
  3. Heat olive oil in a large non-stick skillet over medium heat. Add zucchini and cook, stirring frequently, until shreds soften, about 5-6 minutes. Add garlic and cook and stir another minute. Season to taste with salt and pepper.
  4. Dish up zucchini and serve, passing the herbed Greek yogurt to put on top.
Yield: 4 servings
Prep Time:10 min (plus 30 min resting time)
Cook time: 8 min
Recipe Source: adapted slightly from American Medical Association Family Health Cookbook


7/29/13

Black Eyed Pea Salad with Sriracha Vinaigrette


I've said it before, but I'm a total wimp when it comes to spicy food. My poor little taste buds scream in protest when I eat anything hotter than a bell pepper. For some reason, though, I just love sriracha sauce. It give food such a great flavor that I always look for ways to use it, despite the fact that I can only handle very small quantities of the stuff. This salad is my new favorite use for sriracha sauce, because it is so, so good. It's a great combination of textures and flavors, with the crunchy carrots and celery and the mild smoothness of the black eyed peas. The sriracha vinagrette is amazingly delicious with just enough of a kick. If your taste buds are heartier than mine (and really, most people's are) you can increase the sriracha to make this spicier. I cooked my own black eyed peas from dried beans because it is cheaper to buy them that way, but you can find them canned in some areas or in the frozen section. If you've never tried black eyed peas before, this is a great way to try them. It's a perfect potluck food, side dish, or simple vegetarian lunch. 


Black Eyed Pea Salad with Sriracha Vinaigrette

Heat Oven To 350 Published 07/29/2013
Black Eyed Pea Salad with Sriracha Vinaigrette

Ingredients

  • 2 1/2 tablespoons white wine vinegar
  • 2 tablespoons extra virgin olive oil
  • 1/2 - 1 tablespoons Sriracha sauce
  • 1/2 teaspoon salt
  • 3 cups canned Black eyed peas, drained and rinsed
  • 3 celery ribs, finely chopped
  • 2 carrots, grated
  • 1 diced red bell pepper
  • 2 tablespoons chopped parsley

Instructions

  1. Whisk together vinegar, olive oil, Sriracha and salt in a large bowl.
  2. Stir in black eyed peas, celery, carrots, bell pepper and parsley. Season to taste with salt and vinegar. Serve.
Yield: 4 servings
Prep Time:10 min
Cook time: None
Recipe Source: adapted slightly from wholefoodsmarket.com

 
Pin It button on image hover