Showing posts with label Main Dish. Show all posts

11/13/14

Sausage Stuffed Acorn Squash


When I first moved to Minnesota I kept the Vermont plates on my car for a little while since I was a student and didn't consider myself "permanent" there. One thing I noticed with the out of state plates was that nearly every time I was doing something with my car - filling the tank, getting a car wash, getting the oil changed - someone would ask me about the winters in Vermont. They always wanted to know how bad they were. I thought it was weird for a while until I realized that they were asking because they wanted to know how Vermont winters stacked up against Minnesota winters. They were honestly curious. And after a few years living there, I started to realize why. You see, when you get a foot of snow at the beginning of November, like some parts of Minnesota got this week, or when it is -30 below and your car won't start, or when you know what it feels like to have your eyelashes freeze together, you start to take sick pride in just how horrible the winters are. You have to tell yourself that you are surviving the worst winters possible so that you don't get depressed about the fact that you've been bundling up to go outside for months and you are still months away from wearing sandals. Other places may have tough winters, but you are surviving the toughest.

In honor of all the first snowfalls that fell across parts of the country this week, I'm posting this very wintery comfort food dish. I love squash and sausage, so trying this recipe out I was fairly certain I would like it, but I was surprised at how well the two went together. The roasted acorn squash has a sweet, mellow flavor that balances the salty, spicy sausage really well. The sour cream and cheese  mixed in give the filling a delicious creaminess that is rich without being over-the-top decadent. Celery adds crunch and mushrooms add flavor to a very simple stuffing that is easy to put together. I streamlined the recipe a little bit and started the squash cooking in the microwave while the filling was being cooked so that the overall baking time was an hour less. This recipe can also be lightened up a bit by using turkey sausage and low fat sour cream and it is still rich, delicious and filling. This is the kind of meal that makes you look forward to cold nights and staying in and watching the snow fall. Even in the middle of November.


Sausage Stuffed Acorn Squash

Heat Oven To 350 Published 11/14/2014
Sausage Stuffed Squash

Ingredients

  • 2 acorn squash, halved and seeded
  • 1 pound ground sausage
  • 1 cup chopped celery
  • 1/2 cup chopped mushrooms
  • 1/4 cup chopped onion
  • 1 egg, beaten
  • 1/2 cup sour cream
  • 1/2 cup Parmesan cheese

Instructions

  1. Place squash cut side down on a microwave safe plate and add 2 tablespoons of water to the plate. Microwave 5-6 minutes or until squash is starting to get tender.
  2. While squash is cooking, heat a large skillet over medium heat. Cook and stir the sausage until browned, about 5-7 minutes. Drain fat and discard. Add celery, mushrooms and onion. Cook and stir until celery is softened, 5-10 minutes. Remove skillet from heat.
  3. Beat egg in a large bowl and stir in sour cream and Parmesan cheese. Stir the cheese mixture into the sausage mixture. Divide among the cooked acorn squash halves and place, upright, in a 9x13 baking dish. Bake in oven until the filling is heated through, about 20 minutes.
Yield: 4 servings
Prep Time: 10 mins.
Cook time: 40 mins.
Total time: 50 mins.
Recipe Source: adapted slightly from allrecipes.com

10/20/14

Sweet and Sour Joes with Sesame Ginger Slaw


There are so many reasons why I love these sweet and sour sloppy joes. First of all, I'm a fan of sloppy joes in general. Saucy meat on a freshly cut bun? Delicious. Second of all, the sweet in this recipe comes from maple syrup. As any good former Vermonter, I love maple syrup in just about everything. It has the most amazing, distinct sweet flavor. (I'm talking about real maple syrup here, not the Aunt Jemima stuff.) Thirdly, the sesame ginger slaw that goes on top of these joes is heavenly all by itself, but especially good with the sweet, tangy, spicy meat sauce. It's a happy combination of flavors that make this Asian take on sloppy joes as delicious as the original. Despite the long list of ingredients, the joes and the slaw are quick to put together and easy as well, making this a weeknight meal that you'll come back to again and again.


Sweet and Sour Joes with Sesame Ginger Slaw

Heat Oven To 350 Published 10/20/2014
Sweet and Sour Joes

Ingredients

  • For the Sweet and Sour Joes:
  • 1.5 pounds ground beef or turkey
  • 1 onion, chopped
  • 2 teaspoons minced garlic
  • 1/2 cup maple syrup (or agave)
  • 1/4 cup red wine vinegar
  • 1 16 oz jar salsa (mild, medium or hot based on your taste)
  • 6 hamburger buns
  • For the Sesame Ginger Slaw:
  • 1 package coleslaw mix (16 oz) or 1/2 head of cabbage, shredded
  • 1 cup shredded carrot
  • 1 green onion, chopped
  • 2 tablespoons chopped cilantro
  • 2 tablespoons toasted sesame seeds
  • 1 tablespoon sesame oil
  • 1 tablespoon olive oil
  • 2 tablespoons low sodium soy sauce
  • 1 tablespoon rice wine vinegar
  • 2 teaspoons honey
  • 1 tablespoon fresh ginger, minced
  • 1 tablespoon lemon juice

Instructions

  1. In a large skillet, brown ground beef or turkey and chopped garlic over medium heat until the meat is no longer pink. Add garlic and cook and stir an additional minute.
  2. Stir in the maple syrup, vinegar and salsa. Lower the heat to low and cook, uncovered, for 20 minutes, stirring occasionally.
  3. While meat is simmering, make the slaw. Combine the coleslaw mix, carrots, green onion, cilantro and sesame seeds in a large bowl. In a small bowl, stir together sesame oil, olive oil, soy sauce, vinegar, honey, ginger and lemon juice. Add dressing ingredients to coleslaw mix and stir to mix. Let stand 10 minutes. Taste and add more soy sauce or salt to taste if needed.
  4. When meat has finished simmering, serve over hamburger buns. Top with sesame ginger slaw.
Yield: 6 servings
Prep Time: 25 mins.
Cook time: 35 mins.
Total time: 60 mins.

Recipe Source: Sweet and sour joes adapted from the Vermont Maple Cookbook; Sesame Ginger slaw adapted from seasonwithspice.com

7/10/14

Zucchini, Black Bean and Rice Skillet


This recipe says "summer" to me. It uses zucchini and bell pepper, it is fast and easy, it is cooked on the stovetop and not baked, it is light and healthy. . . it's a perfect summer dish. I love the Southwestern flair it has, and I love that it uses leftover brown (or regular) rice. I always love finding new, different ways to use zucchini and this one is the winner of the season. The zucchini is wonderfully crisp-tender in it and its flavor isn't completely masked by the other ingredients. If you have an abundance of fresh tomatoes in your garden, this dish is even better using diced fresh tomatoes instead of the canned tomatoes. Cook up a batch, eat out on the patio, and taste summer.  


Zucchini, Black Bean and Rice Skillet

Heat Oven To 350 Published 07/10/2014
Zucchini, Black Bean and Rice Skillet

Ingredients

  • 1 tablespoon canola oil
  • 2 cups quartered lengthwise, sliced zucchini
  • 1 green bell pepper, chopped
  • 1 onion, chopped
  • 1 clove garlic, minced
  • 1/4 teaspoon red pepper flakes
  • 1 can (15 oz) black beans, drained and rinsed
  • 1 can (14.5 oz) fire roasted diced tomatoes with garlic, undrained
  • 1/4 cup water
  • 2 cups cooked brown rice
  • 1/2 cup shredded Cheddar cheese
  • Salt and pepper

Instructions

  1. Heat oil in a large, ovenproof skillet over medium heat. Add zucchini, bell pepper, onion and a pinch of salt and cook, stirring occasionally, for 5 minutes. Stir in garlic and red pepper flakes and cook and stir an additional minute. 
  2. Add black beans, undrained tomatoes, water and cooked rice to the skillet. Cook, stirring occasionally, until heated through, about 2-3 minutes. Season to taste with salt and pepper.
  3. Remove skillet from heat and sprinkle cheese on top. Broil 2-3 minutes or until cheese has melted. Serve.
Yield: 4 servings
Prep Time: 15 min
Cook time: 15 min

Recipe Source: adapted from readyseteat.com

6/6/14

Mediterranean Chicken


Flying alone with a two month old across the country this past weekend has increased my faith in humanity. I have never run across such helpful, nice people when flying as I did this past weekend. People offered to lift my bags, guide me to my gate and watch my bags for me. They smiled at Clara, offered me their place in line and asked if I needed any food or water. Every step of the way I met the nicest, sweetest people and I am grateful to all of them for making my trip so easy. Clara, for her part, was a great travel partner. She thoroughly enjoyed the unlimited mom time without a toddler trying to poke her eyes out, and I got to see family and pay my respects to a wonderful man and grandfather. 

Lovely as the weekend was, it was so nice to come back and be home again with my toddler. She was so excited she threw tantrums and napped short for me. Motherhood is the best, isn't it? Since motherhood for me also includes making dinner, I made sure to add some meals to the meal plan for the week that were personal favorites, and this chicken was one. Easy and full of great Mediterranean flavor, this is the type of weeknight meal I love. The basil gives it a happy, fresh flavor, even though most of the ingredients are things I just have stocked in my pantry or fridge. I love how the kalamata olives lend saltiness to the meal. This is one of those times when they are such a star in the meal that regular black olives are just no substitute. I also love serving this over the plain couscous because it gives it such a great texture. You could easily substitute quinoa or some brown rice if you wanted. If you want a fast, easy, healthy meal with unique flavor, this is the one. 


Mediterranean Chicken

Heat Oven To 350 Published 06/06/2014
Mediterranean Chicken

Ingredients

  • 2 tablespoons olive oil
  • 1 1/2 pounds boneless skinless chicken breast cut into 1 inch chunks
  • 1 onion, diced
  • 3 cloves garlic, minced
  • 2 cans (14.5 oz each) diced tomatoes, undrained
  • 1/2 cup low sodium chicken broth
  • 2 tablespoons white wine vinegar
  • 1 tablespoon sugar
  • 1/2 teaspoon dried thyme
  • 1 tablespoon chopped fresh basil
  • 1/2 cup kalamata olives
  • 1/4 cup chopped fresh parsley
  • salt and pepper
  • Cooked couscous

Instructions

  1. Heat the oil in a large non-stick skillet. Add chicken and cook, stirring frequently, until all sides are browned but the chicken pieces aren't completely cooked through, about 4-6 minutes. Remove the chicken to a bowl.
  2. Add the chopped onion to the now-empty skillet and cook until the onion is starting to soften, about 3 minutes. Add the garlic and cook and stir 30 seconds. Add undrained tomatoes and bring to a boil. Reduce heat and add chicken broth, vinegar, sugar and thyme. Simmer for 10 minutes.
  3. Add chicken back to the skillet, cover and cook until chicken has cooked through, about 5 minutes. Chop kalamata olives finely, then add to the skillet with the parsley and fresh basil. Cook 1 minute, season with salt and pepper and serve over cooked couscous.
Yield: 6 servings
Prep Time: 15 min
Cook time:25 min

Recipe source: adapted from allrecipes.com

5/27/14

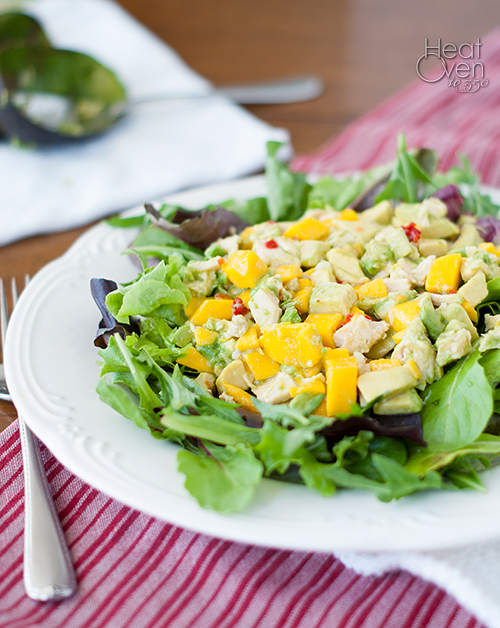
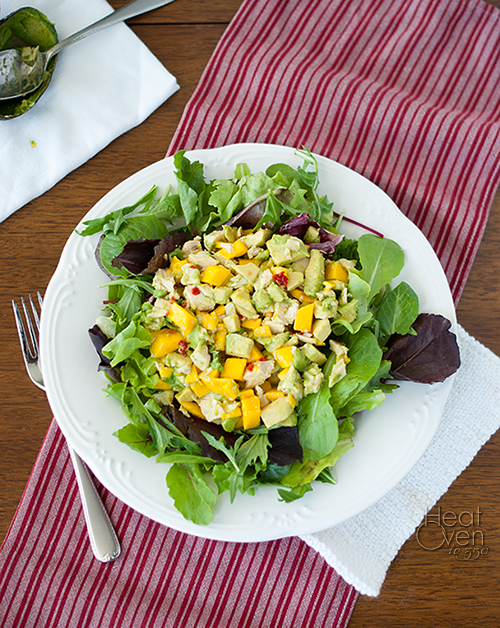
Mango Chicken Avocado Salad


Mango and avocado make one of my favorite flavor combinations. There is something tropical and refreshing about it. With spring greens and chicken in a salad that refreshing flavor becomes an entire meal. A happy, tropical vacation meal. Especially when add on the simple tangy/sweet/spicy lime dressing. This salad says "summer" and "relaxing by the pool"and all kinds of wonderfully sunny things. It is light, healthy, and filling, and easy to make and it makes a perfect lunch or light dinner. Throw it together, eat it outside on the porch, and enjoy that summer is here. 


Mango Chicken Avocado Salad

Heat Oven To 350 Published 05/27/2014
Mango Chicken Avocado Salad

Ingredients

  • 2 tablespoons brown sugar
  • 1/4 cup water
  • 1/3 cup lime juice
  • 3/4 teaspoon chili garlic sauce
  • 4 cups shredded, cooked chicken
  • 2 medium mangos, peeled, seeded and diced
  • 2 medium avocados, pitted and diced
  • 1 (10 ounce) package spring lettuce mix

Instructions

  1. In a microwave safe bowl, combine brown sugar and water and microwave 1 minute. Stir until sugar is dissolved (microwaving more if necessary) and stir in lime juice and garlic sauce. (If you can make the dressing a day or at least a couple hours ahead of time it is even better.)
  2. In a large bowl, gently toss together the chicken, mango and avocado. Add 2 tablespoons of the lime dressing and mix.
  3. Divide the lettuce among four plates, then top with chicken mixture. Pour dressing to taste over each plate and serve.
Yield: 4 servings
Prep Time:10 mins.
Cook time:2 mins.
Total time: 12 mins.
Recipe Source: Adapted from allrecipes.com

5/22/14

Grilled Sweet and Sour Chicken with Spinach


My brother is the grill master in the family, and when he recommends a recipe I usually try it out as soon as I can because I know it is going to be good. The only problem is that he is one of those crazy people that grills year round, even in tough Vermont winters, so when he recommended this recipe to me it was January. As in, snowy, cold, wet and definitely not grilling season in my book. Now that the weather is warm again and the grill has been dusted off, this recipe has become a favorite in our house. It is easy, has simple ingredients, and tastes wonderful. The chicken thighs are marinated in a simple marinade that gives them a delicious sweet and sour flavor after grilling. The marinade is saved and cooked with spinach until the spinach wilts, giving the spinach the same great taste. Chicken thighs are great on the grill because they don't dry out as quickly as chicken breasts so even someone without great grilling skills could make these turn out great. They also happen to go on sale where I live fairly often, making this a cheap recipe, too. I almost didn't try the spinach cooked in the leftover marinade because I wasn't sure I would like it, but my brother specifically recommended it and I am glad he did. It is so fast and easy, but really tastes great and is delicious with the chicken. I love recipes with a built-in healthy side dish. Kick off your grilling season with this delicious chicken dish and you will be happy you did.


Grilled Sweet and Sour Chicken with Spinach

Heat Oven To 350 Published 05/22/2014
Grilled Sweet and Sour Chicken with Spinach

Ingredients

  • 1/4 cup rice wine vinegar
  • 2 tablespoons canola oil
  • 2 tablespoons granulated sugar
  • 1 tablespoon soy sauce
  • 1 teaspoon hot chili-garlic sauce
  • 4-6 boneless chicken thighs (about 1 1/2 pounds)
  • 4 large handfuls baby spinach leaves, about 11 ounces total
  • 1 plum tomato, seeded and chopped

Instructions

  1. Combine rice vinegar, canola oil, granulated sugar, soy sauce and chili-garlic sauce in a medium bowl. Pour marinade into a ziploc bag and add chicken thighs. Close the bag and refrigerate 1-2 hours, turning occasionally.
  2. Remove thighs from ziploc bag and save marinade. Grill thighs over direct high heat, turning every 3-4 minutes, until cooked through, about 10 minutes.
  3. While thighs are grilling, pour reserved marinade into a large skillet and bring to a boil over medium-high heat. Let boil for 1-2 minutes, then add spinach and tomato. Cook until spinach is wilted, about 3-4 minutes.
  4. Serve grilled thighs over warm wilted spinach.
Yield: 4 servings
Prep Time: 15 min
Cook time: 10 min (plus 1-2 hours marinating time)
Recipe Source: Weber's Real Grilling by Jamie Purviance

5/16/14

Spinach Chicken Tortilla Bake


A few weeks into my new life as a stay at home mom I came to a sad realization. I had honestly thought that because I was home more and not working that the house would be soooo clean. You see, instead of just having evenings and weekends to do household chores, I'd have all day! Right? Except I didn't quite realize that being home all day also meant making messes all day. Especially with a toddler who takes baby feeding times as a opportunity to get into everything she can. It was a sad moment when I realized that keeping the house clean would be just as hard or harder than before. 

It was a similar realization when it came to making dinner. I still need fast dinner recipes with minimal prep because even though I'm not starting dinner after I get home at five, I'm still running around the kitchen like a mad woman getting everything prepped when it comes to dinner time because I'm fitting meal prep in between feedings, book reading and putting bandaids on various invisible ouchies.

This tortilla bake is the latest favorite for fast dinners. The prep time is minimal, especially if you started with already shredded, cooked chicken. I'm a fan of the little hands on time, but also of the ricotta and spinach layers. The ricotta gives the tortilla bake a creaminess that reminds me of lasagna, but with a twist. The spinach, although it seems like a lot when you are putting the layers together, cooks down to nice, soft layers that add an earthy (in a good way) taste to the chicken, cheese and tortillas. I'm not much of a fan of raw spinach, but cooked spinach is my friend. The whole dish gets a slight tanginess from the salsa verde that I love. If you aren't a fan of salsa verde you could substitute regular salsa but the taste will be completely different and lose its uniqueness. You can control how spicy this dish is with the salsa verde you choose and the ratio of pepperjack cheese to monterey jack. You can also make this a little healthier by subbing in whole wheat tortillas for all or part of the tortillas in the recipe. It's such a versatile, delicious dish you will almost forget that you put it together while talking on the phone, nursing a baby, and playing stuffed animal soccer with your toddler.


Chicken Spinach Tortilla Bake

Heat Oven To 350 Published 05/16/2014
Chicken Spinach Tortilla Bake

Ingredients

  • 1 tablespoon extra-virgin olive oil
  • 1 pound boneless skinless chicken breasts
  • Salt and pepper
  • 1 1/2 cups salsa verde
  • 3/4 cup ricotta cheese
  • 8 large flour tortillas, ripped into large pieces
  • 3 large handfuls baby spinach
  • 1 cup shredded pepper jack cheese
  • 1 cup shredded monterey jack cheese
  • 1 can black beans, drained and rinsed

Instructions

  1. Heat oven to 450 degrees. Place a large skillet over medium-high heat and heat olive oil until shimmering. Slice chicken breasts in half and season with salt and pepper. Add chicken breasts to skillet and cook, turning once, until cooked through. Let cool slightly and shred.
  2. In a medium bowl, whisk together salsa verde and ricotta.
  3. Add just enough of the salsa verde mixture to cover the bottom of a 8 or 9 inch springform pan. Top with 1/4 of the torn tortillas, then 1/3 of the chicken, black beans, spinach, a heaping 1/2 cup of the salsa verde mixture and 1/3 of the cheeses. Repeat layers, ending with a final layer of tortillas and cheese on top.
  4. Cover springform pan with foil and bake 15 minutes. Remove foil and bake another 10-15 minutes or until cheese has browned. Remove from oven and let stand for 10 minutes before separating the springform pan and cutting into slices.
Yield: 4-6 servings
Prep Time: 15 min
Cook time: 25 min
Recipe Source: adapted from Rachael Ray


5/7/14

Cheesy Quinoa and Broccoli

Mother's Day is this coming Sunday, and to celebrate I'm posting kid friendly recipes all week. I may be alone in this, but sometimes I have trouble figuring out different healthy(ish) options to serve my toddler, especially easy lunch recipes, and my idea of celebrating mothers is to have five new easy recipe options. Happy Mother's Day!


This is one of my favorite ways to serve quinoa. It is so easy, but tastes so good. I've found that even people who generally don't like quinoa tend to enjoy this dish. How can you go wrong when you cover it with cheese? It is so easy it seems like there must be a catch. Like maybe it isn't as good as I'm proclaiming. Trust me, it is. And trust me, it really is as easy as cooking the quinoa and broccoli and stirring in some cheese. Really. The classic flavors of cheddar and broccoli are perfect with quinoa as the base, and quinoa and broccoli cooked in broth are flavorful and delicious and only need the addition of some melted cheese to complete the meal. What I love about serving this to my daughter is that the cheese holds the quinoa together, making it easier for her to feed herself without thousands of little quinoa seeds ending up on the floor the way they do with most quinoa dishes. (Thousands may be an exaggeration, but it doesn't feel like that when you are sweeping them up.) This makes an easy lunch, dinner, or great side dish. If you've been on the fence about quinoa or have heard the hype but haven't given it a try, this recipe would be a great place to start.


Cheesy Quinoa and Broccoli

Heat Oven To 350 Published 05/07/2014
Cheesy Quinoa and Broccoli

Ingredients

  • 1 cup quinoa, rinsed
  • 2 cups chicken or vegetable broth
  • 2 cups chopped fresh broccoli
  • 1 cup shredded Cheddar cheese
  • salt

Instructions

  1. Add quinoa and 1 3/4 cup broth to a saucepan and bring to a boil over high heat. Reduce heat to low, cover, and simmer 10 minutes.
  2. Stir broccoli into quinoa, adding additional 1/4 cup broth if all broth has been absorbed already, and simmer broccoli and quinoa an additional 5-7 minutes or until broth is absorbed and quinoa is tender.
  3. Remove pan from heat and immediately stir in Cheddar cheese. Cover and let sit 2-3 minutes for cheese to melt. Stir melted cheese into quinoa and season with salt. Serve.
Yield: 4 cups
Prep Time:1 mins.
Cook time:20 mins.
Total time: 21 mins.
Recipe Source: adapted from all recipes.com

5/6/14

Pea Pesto Pasta

Mother's Day is this coming Sunday, and to celebrate I'm posting kid friendly recipes all week. I may be alone in this, but sometimes I have trouble figuring out different healthy(ish) options to serve my toddler, especially easy lunch recipes, and my idea of celebrating mothers is to have five new easy recipe options. Happy Mother's Day!


Sneaking veggies into a meal isn't all it is cracked up to be. Sometimes they seem to work seamlessly into a dish, while other times you just aren't fooling anyone. This pea pesto is one of my favorite seamless times. It is super simple, but somehow comes out tasting like you actually put effort into it. And the taste? Not veggie-like at all. In fact, it tastes just like a slightly sweet pesto and in many ways is an improvement on plain pesto because it is more mild. I love the bright green color and slightly chunky texture the peas add to this sauce. It seems like pasta dishes in general are usually popular with kids, and this one is no exception despite being covered with a vegetable. My toddler gives this pea pesto props for being fun to squeeze in her hands as well as into her mouth. Overall, it is a win for everyone. 


Pea Pesto Pasta

Heat Oven To 350 Published 05/06/2014
Pea Pesto Pasta

Ingredients

  • 1 pound (16 oz) whole wheat penne pasta
  • 1 (10 oz) package frozen peas
  • 1 tablespoon butter
  • 1/2 cup basil pesto
  • salt
  • Grated Parmesan for serving

Instructions

  1. Cook pasta according to package directions. Save out 1 1/2 cups of the pasta cooking water before draining.
  2. While pasta is cooking, cook peas according to package directions. Drain water from peas and add to the bowl of a food processor. Add butter and process until peas are coarsely chopped. Add 1/4 cup of the pasta cooking water and pesto and process until smooth.
  3. Add drained pasta back to the pot along with 3/4 cup of the pasta cooking water and the pea mixture. Stir together, adding mor cooking water if needed to get desired sauce thickness. Season to taste with salt and serve with grated Parmesan on top.
Yield: 4-6 servings
Prep Time: 5 mins.
Cook time:12 mins.
Total time: 17 mins.
Recipe Source: huffingtonpost.com

5/5/14

Apple Sandwiches

Mother's Day is this coming Sunday, and to celebrate I'm posting kid friendly recipes all week. I may be alone in this, but sometimes I have trouble figuring out different healthy(ish) options to serve my toddler, especially easy lunch recipes, and my idea of celebrating mothers is to have five new easy recipe options. Happy Mother's Day!


I tried this recipe originally out of curiosity more than anything, but my daughter and I liked it so much it is now in regular rotation at our house. It is so simple it almost doesn't even qualify as a recipe, but I had never heard of anything like it before. First you shred an apple, then mix it with peanut butter, honey and raisins and divide it over toasted bread to make a sandwich spread that is fun and different. Its flavor reminds me of peanut butter and banana sandwiches, but with a twist. The spread is fairly sweet as written, but you don't use much per sandwich so it balances out. You could easily adjust the amounts to your preference or go crazy and add extra ingredients like sunflower seeds or chopped peanuts for crunch. If you have kids who like to help out in the kitchen this is a great meal to make with them if you don't mind a little mess because they can help with the shredding, toasting and mixing and the exact amounts aren't essential. 


Apple Sandwiches

Heat Oven To 350 Published 05/05/2014
Apple Sandwiches

Ingredients

  • 1 large apple
  • 2 tablespoons peanut butter
  • 1 tablespoon honey
  • 2 tablespoons raisins
  • 6 slices of bread

Instructions

  1. Grate the apple using the large holes of a box grater. Add grated apple to a bowl and stir in peanut butter, honey and raisins.
  2. Toast the bread and divide the apple mixture evenly over three pieces of bread. Top with remaining three pieces of bread and serve.
Yield: 3 sandwiches
Prep Time: 5 mins.
Cook time: None
Total time: 5 mins.
Recipe Source: putalydonit.blogspot.com, originally from The Friend magazine

4/29/14

Baked Chicken Asparagus Risotto


Some things you just can't cheat on. Your toddler will always know when you are trying to sneak some chocolate out of the pantry no matter how hard you try to distract her with balloons or bubbles. Your husband will always notice when you use ground turkey instead of ground beef, even though you swear you can't tell the difference yourself. (How can he tell under all those seasonings and tomato sauce?). There is no substitute for rising time with yeast dough, and frozen, mashed bananas will never be ice cream. 

Risotto, though. You can cheat on risotto. Yes, it is supposed to be stirred, stirred, stirred and develop a creamy texture from that process, but you can get some pretty good risotto with other methods that are way, way, way easier. Using the pressure cooker is one way I've posted on before, but this version might be even simpler. It is just baked. Seriously. You bring the rice and water to a boil, then stick it in the oven so it cooks the rest of the way at a very low simmer. You still get a creamy dish and your arms will thank you. The flavors of this baked risotto make it a favorite of mine in the spring. They are so simple, but bright and fresh tasting. Creamy rice meets chicken, asparagus, basil, Parmesan and lemon. That's a happy flavor party in my opinion. It's one of my favorite ways to sneak asparagus into a main dish instead of always serving it on the side, and the fact that it makes a lot doesn't hurt since leftovers are my hero. If you've wanted to cook risotto at home but were intimidated by the process, this baked version would be a great way to try.

Baked Chicken Asparagus Risotto

Heat Oven To 350 Published 04/29/2014
Baked Chicken Asparagus Risotto

Ingredients

  • 3 tablespoons butter
  • 1 medium onion, minced
  • 2 garlic cloves, minced
  • 1 cup Arborio rice
  • 4 1/2 cups low sodium chicken broth (plus more if needed)
  • 3 cups cooked chicken
  • 1 pound asparagus, cut into 1 inch pieces
  • 3 cups chopped cooked chicken
  • 2 T lemon juice, plus more to taste
  • 2 tablespoons chopped fresh basil
  • 3/4 cup grated Parmesan
  • salt

Instructions

  1. Heat oven to 425 degrees. In a Dutch over over medium heat, melt butter. Add onion and garlic and cook until softened, about 5 minutes. Add rice and cook and stir 2 min or until rice begins to brown.
  2. Stir in chicken broth, bring to a boil, then cover and transfer to oven. Bake for 20 minutes.
  3. Remove dutch oven from the oven and stir in the chopped asparagus and cooked chicken. If risotto is starting to look dry, add 1/4 cup more chicken broth. Cover again and return to the oven for 10 minutes.
  4. After removing Dutch oven from the oven, let stand 5 minutes. Stir in 2T of the lemon juice, the basil and the Parmesan. Stir until Parmesan has melted. Season with additional lemon juice and salt to taste. Serve.
Yield: 4-6 servings
Prep Time:10 min
Cook time: 40 min

Recipe source: Adapted from myrecipes.com

4/22/14

Creamy Hawaiian Haystacks From Scratch


Raise your hand if you've heard of Hawaiian Haystacks. Those of you with your hand raised, I'm betting a good percentage of you are from Utah. Am I right? I've lived in other areas of the country and never run across a single Hawaiian haystack, but since I've been in Utah I've had them on several occasions. In fact, sweet people from church brought me meals after the birth of each of my daughters and both times, different people brought Hawaiian haystacks. I've started joking that I have babies just to get someone to make them for me. It's only partially a joke. (The other reason I have babies? So my mom comes for a week and cleans my house. Totally worth the labor and delivery. If you think I'm joking, you should see my mom in action.)

One reason I think this dish has caught on so well here is that it is so simple, fast and easy. You can easily adjust it to feed as many or as few people as you like, and the toppings can be added according to individual tastes, making this a great meal for picky eaters. And what is exactly are Hawaiian haystacks? Imagine a silky, creamy gravy with chunks of chicken, served over rice and topped with black olives, sweet coconut, chunks of pineapple and green onions. With a few of those tasty, naughty-delicious chow mien noodles on top for added crunch. It's a delicious combination of flavors and textures.

Everyone has their own way of making the chicken and gravy to go on top of the Hawaiian haystacks, but most of them use cream of chicken soup. I have nothing against these recipes and they're usually pretty tasty and also easy. In my quest to reduce the amount of processed foods I make for my family (and yes, I recognize how hypocritical it is to say this considering the amount of Peeps I ate on Easter) I decided to come up with a chicken gravy recipe from scratch. I ended up with a simple sauce thickened with flour and butter, with onions and garlic for flavor and Greek yogurt for some creaminess and tanginess. It is nearly as easy as the condensed soup version and I think it is even tastier. It is a thick sauce, which is how I prefer it, but you could thin it out with some milk or broth if you prefer. I serve mine over brown rice to be a little healthier, but white rice is delicious, or you could go crazy and use any favorite grain.


Creamy Hawaiian Haystacks From Scratch

Heat Oven To 350 Published 04/22/2014
Healthier Hawaiian Haystacks

Ingredients

  • 6 tablespoons butter
  • 1 large onion, chopped fine
  • 4 cloves garlic, minced
  • 1/2 cup flour
  • 3 cups chicken broth
  • 1/2-1 cup non-fat Greek yogurt
  • 4-5 cups chopped cooked chicken
  • salt and pepper
  • cooked brown (or white) rice
  • toppings - pineapple, coconut, shredded cheese, black olives, green onions, red bell pepper, chow mien noodles, etc.

Instructions

  1. In a medium saucepan, melt the butter over medium heat. Add onion and garlic and cook, stirring, for 2-3 minutes or until onion is softened. Stir in the flour and cook, stirring, for 1 minute. Slowly whisk in broth, stirring to incorporate completely after each addition. Cook, stirring frequently, until mixture is bubbly and thickened.
  2. Stir in 1/2 cup Greek yogurt and cooked chicken and cook until chicken is heated through. Add more Greek yogurt to taste, if desired, and salt and pepper. (You will need a fair amount of salt here, especially if you use low-sodium chicken broth. If the sauce is too thick for your taste at this point, add some milk or additional broth and season again with salt to taste.) 
  3. Serve chicken sauce over warm brown rice, and top with your choice of toppings.
Yield: 4-6 servings
Prep Time: 10 mins.
Cook time: 10 mins.
Total time: 20 mins.
Recipe Source: Heat Oven To 350

4/11/14

Slow Cooker Tamale Pie


Have you ever seen pictures of cute toddlers cradling their newborn siblings, or giving them sweet kisses on the forehead? Adorable, right? And sooooo not my toddler. My husband and I thought that since Amelia is outgoing and was not much of a mama's girl to begin with that the transition from only child to older sister would go smoothly. 

We were so wrong. 

Once Amelia figured out that this sleepy, poopy creature that takes away some of mom's time was here to stay she unleashed an epic whiny mode the likes of which we had never seen before. The new baby was public enemy #1, and everyone who held her or paid attention to her was dead to Amelia. As you can imagine, it was quite charming. Luckily, as we finish up week 3 of sister-mageddon, things are starting to look up. Clara is awake more which seems to delight Amelia, and Amelia has started asking about her when she is away napping. There were even a couple spontaneous kisses on the forehead the other day that almost made my heart stop. Hopefully things will continue to improve. 

In the midst of the sibling attention wars and round-the-clock feedings, slow cooker meals like this one are lifesavers. Thank heavens for nap time, because it is the only reason we are wearing clean clothes and ever have home cooked meals. This tamale pie is easy to throw together and doesn't taste like your regular crock pot meal. In fact, it is more like a casserole than anything else, but we don't use that word in our house or my husband will not touch it. It isn't the loveliest dinner, but one bite and you'll be a fan. A slightly spicy meat and bean mixture is topped with a cornbread layer and the whole thing bakes in the slow cooker so it is wonderfully tender and the flavors meld. Add some cheese on top (because cheese makes everything good) and you've got an easy dinner that is ready no matter how busy things get at dinner time. 


Slow Cooker California Tamale Pie

Heat Oven To 350 Published 04/11/2014
Slow Cooker California Tamale Pie

Ingredients

  • 1 pound lean ground beef, turkey or chicken
  • 1 medium onion, chopped fine
  • 3 cloves garlic, minced
  • 2 tablespoons chili powder (use a mild chili powder here or reduce the amount if you don't want it spicy)
  • 1/2 sweet onion, chopped
  • 1 1/2 teaspoons cumin
  • 1 can black beans, drained and rinsed
  • salt
  • 3/4 cup cornmeal
  • 1 1/4 cup milk
  • 2 large eggs, beaten
  • 1 1/2 teaspoons salt
  • pinch of ground cumin
  • 2 cups frozen corn kernels
  • 1 14 oz can pitted ripe California black olives, drained
  • 1 16 oz can diced tomatoes with green chiles
  • 1 1/2 cups sharp cheddar cheese

Instructions

  1. Heat a large skillet over medium heat and add ground meat, onions and garlic. Cook, stirring frequently, until meat has browned. Drain fat and add chili powder, ground cumin and black beans. Stir to combine and put meat mixture in the bottom of a 5-6 quart slow cooker.
  2. In a medium bowl, combine cornmeal, milk, eggs, salt, cumin, corn, olives and tomatoes. Pour mixture over meat mixture in the slow cooker.
  3. Cover the slow cooker and cook on high for 3 to 4 hours. Sprinkle the cheese over the top of the tamale pie, cover and cook 10 minutes to melt the cheese.
Yield: 6 servings
Prep Time: 10 mins.
Cook time: 04 hrs
Total time: 4 hrs. 10 mins.
Recipe Source: Adapted from Not Your Mother's Slow Cooker

 
Pin It button on image hover