9/30/11

S'mores Popcorn Balls


They should require you to take a course when you get your first Costco or Sam's Club membership. Some kind of class that will teach you about the psychology of buying and explain that although you can now get an assortment of food, gift and leisure items for cheap prices, you don't always need them. In fact, you usually don't need them. They're so cheap, though, it's hard to pass up. Case in point, my husband and I went to Costco last week to buy some water softener salt. We came out with salt, new wiper blades, brown sugar, a 36 pack of Rolos and a set of 8 solar pathway lights. We don't even have a pathway to light. We should really start limiting our trips there to once a month. 

Sometimes finding a new food blog can be similar. I might stumble on one in a search for a specific type of recipe, but end up looking around and finding something I like even more. These s'mores popcorn balls are the "wiper blades" of an internet search last week for a soup recipe. I have yet to make the soup, but I have to admit that I've already made these twice. Fall makes me crave popcorn and popcorn balls, so these are perfectly fitting my mood right now. They're a little bit summer, and little bit fall, and a whole lot of easy yumminess. They have all the classic tastes of a s'mores in a quick popcorn ball. To give them an extra bit of flavor, I toasted the popcorn balls for a few minutes under the broiler so the marshmallow holding the ball together would get more of a caramelized flavor. Add some melted milk chocolate (I think these taste even better when the chocolate is still melted, but boy is it messy) and you've got my new favorite snack. 

Until my next blog search, that is. 


S'mores Popcorn Balls

Ingredients

  • 10 cups popped popcorn
  • 2 cups chopped or broken graham crackers (keep the pieces about 1/2" in size)
  • 1 cup milk chocolate chips (optional)
  • 1 oz bag regular (not mini or jumbo) marshmallows
  • 4 tablespoons unsalted butter
  • 1 pinch or two salt
  • 1 teaspoon vanilla
  • 2 ounces chopped milk chocolate, melted

Directions

  1. In a large roasting pan coated with nonstick spray, toss together popcorn, graham cracker pieces and chocolate chips (if using).
  2. In a large saucepan, melt together butter, marshmallows and salt, stirring until smooth. Remove from the heat and stir in vanilla. Pour melted marshmallows over the popcorn mixture and stir to coat - set aside until cool enough to handle.
  3. Lightly coat hands with cooking spray - shape the mixture, using roughly 3/4 cup per, into balls, placing on a parchment-lined baking sheet. Allow to cool completely.
  4. Heat broiler and place popcorn balls on a large baking sheet. Broil the popcorn balls until lightly browned, watching carefully and taking the baking sheet out to turn the popcorn balls every few minutes. Let cool.
  5. Drizzle the tops of the balls with melted chocolate - place into the refrigerator until set, about 10 minutes.
Prep Time: 10 min Cook Time: 5 min Ready in: 20 min Yield: 10 popcorn balls

Recipe Source: adapted from Canadian Living via desertculinary.blogspot.com


9/28/11

Homemade Bouillon


I'm a list shopper when it comes to buying groceries. My mind goes blank when I walk into a grocery store and I forget all about the great meal plan I made just that morning. Add to that the fact that I only go grocery shopping once a week and it makes a "no list" scenario really ugly. Ugly as in, "Sorry babe, but we're eating old cornflakes with diluted cream for breakfast for the next few days" ugly.
Despite my diligence in using a list, though, there are a few ingredients I can never remember to buy. For some reason, the words "chicken broth" are invisible to me when on a grocery list. I skip right over them every time and come home without a single can. After multiple last-minute trips to the grocery store to buy more broth for a soup already in progress or rice or whatever I happen to be cooking, I finally broke down and starting buying some bouillon-type paste that can be used to reconstitute broth in a pinch. It's not my favorite solution since I cringe sometimes when I read the ingredient list, so I finally decided to try making my own emergency bouillon.
As with many great kitchen adventures at my house, this one began with a google search. A couple methods to make your own bouillon involved boiling down chicken stock to a very concentrated, syrup-like form. If you are looking for a meaty flavor in your bouillon, this might be the route you would want to take. Since most of the time I just need a little flavor to be added to a soup or other food, it isn't essential for me to have chicken flavor in my back-up bouillon. 

Also, I'm lazy.


The recipe that finally caught my eye was from The River Cottage Preserves Handbook as seen on 101Cookbooks. It appealed to my laziness because all you do is chop things up in a food processor and you are done. The original recipe had a fairly long ingredient list that included things like celery root and fennel. Since the purpose of this bouillon was to eliminate trips to the store and not add them, I decided to simplify it a bit and just include ingredients that I like. If you decide to make this at home, feel free to modify it to fit your tastes. It also a great way to us up extra vegetables or herbs that you might have around. I would just advise against using anything too distinctly flavored, such as garlic, so that your finished bouillon will be more versatile. Then again, if you put garlic in just about everything, you might want to add it. 
The finished product from spending a few minutes of stuffing veggies of your choice into the food processor is a paste-type mixture that you can use to replace bouillon in recipes that call for it. When I want to use it as stock, I add 1 tsp per cup of water. You will likely still need to add salt to taste, despite how much salt is in the bouillon recipe. Also, I should warn you that you must not, under any circumstances, taste the bouillon plain. Trust me on this. You and your tongue will regret it for about five minutes. If you are a habitual taster (which is a good thing, usually) you should dilute it in some hot water and adjust your seasoning from there. Due to the same high salt content that makes it impossible to eat plain, you can store it in the freezer and it won't solidify, making it easy to scoop out a teaspoon or two when you need it. 

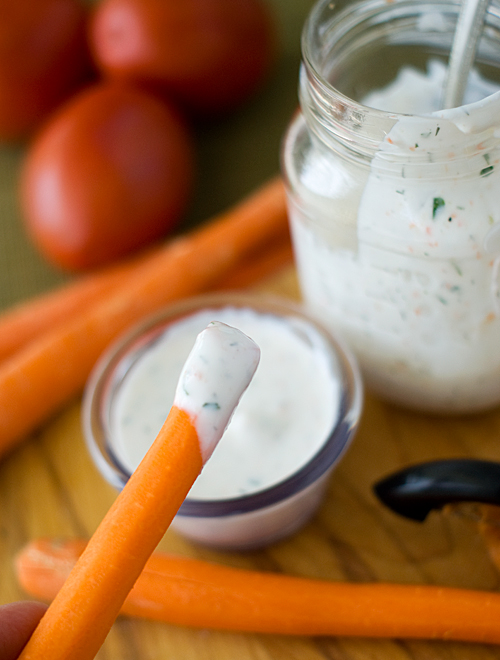
As I said before, this bouillon won't give a meaty flavor to your food so this won't work for all recipes. I've found that it works well for foods where the bouillon can be cooked for a good amount of time before serving, such as in soups, some pasta dishes and slow cooked food. It also makes a killer ranch dressing, which I'm sharing the recipe for as well. In fact, with how easy this is to make, I'd say it is worth making it for the ranch dressing alone.

 Just don't forget to buy the lettuce when you are at the store. 


Homemade Bouillon Substitute

Ingredients:

1 lb carrots, peeled
8 oz (about 1/2 bunch) celery
8 oz onion (one medium)
3/4 cup salt
1/2 bunch cilantro
1 bunch parsley

Add the carrots, celery and onion to the food processor and pulse about twenty times. Stir the chopped vegetables to get the larger pieces to the bottom, add the salt and pulse a few more times. Add the cilantro and parsley and pulse until the mixture is finely chopped and forming a loose paste, stirring as necessary to get larger pieces to the bottom to be chopped. Store in the fridge for up to a week or the freezer for two months. Makes about 3 1/2 cups.

Recipe Source: adapted from 101Cookbooks.com


Homemade Ranch Dressing

Ingredients:

1/2 cup low-fat sour cream
1/4 cup buttermilk
1 1/2 - 2 tsp homemade bouillon (depending on how salty your bouillon is)
1/8 tsp dried dillweed
1/8 tsp garlic powder (fresh garlic works, too, but I find it is harder to get it evenly distributed in the dressing.)
1/8 tsp fresh pepper

In a small bowl, whisk together the ingredients. Add salt and pepper and more bouillon to taste. Adjust consistency with additional buttermilk or sour cream. Makes about 1 cup dressing. 


9/26/11

Buffalo Chicken Nuggets


Believe it or not, the following flow chart is the product of nearly a year of trial and error at my house:

Ask your husband if he wants some buffalo wings.
YES
Are the wings going to be boneless?
YES
Are the wings going to be breaded?
YES
Are you making a large batch at once?
YES
Bake them all at once in the oven.  

NO


NO


NO


YES


NO


Sit back and relax.
Start over.
NO
Is the breading crunchy?
Pan fry them.


It all started as a nice gesture on my part to try to make one of my husband's favorite foods at home. He was appreciative of every batch, but would ask for some small tweak of the recipe every time I made them. First the bones had to go. Then it had to be breaded. Then the breading had to be crunchier. Decisions had to be made about white or dark meat, pan frying or baking, the amount of spiciness, and the size of the boneless wing.

After much trial and error, this is the recipe that we ended up with. The chicken is moist and flavorful, coated with a non-soggy breading, baked in the oven for healthiness and uniformity, (I could never fit enough in a pan to cook servings for both of us at the same time.) and uses all white meat. (Boneless chicken thighs also work. We just prefer the texture of the chicken breasts.) They have a very moderate amount of heat, but not so much that they are inedible. (Not as if that ever happened along the way. . . ) They are fast and easy to make and are a great way to get buffalo chicken taste without leaving your house.

After all the tweaking and changes, I have to say that I was pretty proud of myself when I finally came out with a batch that my husband liked. That is, I was proud until he paused while halfway through eating and asked me if they were chicken wings or chicken nuggets. He took a glance at the frustration on my face and wisely ate the rest of his dinner without saying anything else.

I've got a pretty smart husband, even if he is as picky eater.


Buffalo Chicken Nuggets

Ingredients

  • 1 1/2 cups crispy rice cereal
  • 1/2 cup flour
  • 1/2 tsp sugar
  • 2 teaspoons paprika
  • 1/4 teaspoon seasoned salt
  • 1/8 - 1/4 teaspoon ground red pepper (cayenne) (1/8 tsp is mildly spicy; use more if you want your nuggets to have a little more kick.)
  • 3 tablespoons canola or soybean oil
  • 2 tablespoons red pepper sauce (like Tabasco or Frank's)
  • 1 lb boneless skinless chicken breasts, cut into 1-inch pieces
  • 1/4 cup fat-free sour cream
  • 1/4 cup reduced-fat ranch dressing

Directions

  1. Heat oven to 425°F. In 1-gallon resealable food-storage plastic bag, place cereal; crush with rolling pin. Add flour, sugar, paprika, seasoned salt and red pepper; mix well.
  2. Prepare a baking sheet by lining it with aluminum foil and placing a cooling rack on it.
  3. In small bowl, stir together oil and pepper sauce. Coat chicken pieces with oil mixture.
  4. Shake about 6 chicken pieces at a time in bag of cereal mixture until coated. Shake off any extra mixture. Place chicken pieces in single layer on the cooling rack set in the lined baking sheet. Spray with vegetable oil spray.
  5. Bake about 10-15 minutes or until chicken is no longer pink in center. (If coating looks dry, remove chicken, turn, and spray with more vegetable oil spray halfway through baking.) Meanwhile, in small bowl, stir together sour cream and dressing. Serve sauce with chicken.
Prep Time: 15 min Cook Time: 15 min Ready in: 30 min Yield: 4 servings

Recipe Source: adapted from www.bettycrocker.com


9/23/11

Toasted Coconut Pretzels


Unofficial "dos and don'ts" of riding public transportation:

1. If you are sitting with someone you do not know and the bus/train clears out enough that there are many extra seats, do get up and move to one of the extra seats. Being boxed in by someone is never fun. 

2. If you are on a morning bus/train and it is before 7:30 AM, please do not talk. Most people on the bus are trying to convince themselves they are still in their warm, cozy bed. Don't destroy that illusion by chatting.

3. Even during daylight hours, don't talk on your phone for the entire bus/train trip. Short calls to confirm dinner plans or to check on children are okay. Long calls to your mom about some weird rash that you have are not. The other riders can all hear you, and chances are one of they will have to sit with you in the near future. Don't make it awkward.

4. Don't skip the deodorant. Ever. And don't skip the deodorant, sit in front of someone trying to write a blog post about food, hold one arm on the baggage shelf overheard and point the air blowers on your face/armpit. No one likes BO blowing in their face, my friend. 

5. Do warn the person behind you if you are going to suddenly recline your seat. If there is a computer user sitting behind you, she will thank you. 

Following these simple rules on the bus will make you a very popular public transportation rider. I promise you. At very least I will be your new best friend. And just so you know I'm not a hypocrite, I follow these dos and don'ts myself. 

Some dos and don'ts that I don't follow, however, are the regular dos and don'ts for making pretzels. You might have noticed this from the picture. Did I boil these pretzels? Nope. Are they coated with salt? No. Do they taste good with mustard? Definitely not. 

Instead, they are sweetened, buttery, biscuit-like pretzels with a nice layer of toasted coconut. My apologies for breaking the rules. Hopefully you'll forgive me, because these things are tasty. They have just the right amount of sweetness and toasted coconut flavor. They get extra depth of flavor from letting the yeast rise slowly in the fridge and by cutting in small pieces of butter. The pretzels have a soft, chewy texture that just works perfectly. They are great as part of a breakfast or brunch, but would also be wonderful with a butternut squash or sweet potato soup. Or in multiples as a late night snack, or a wow-these-are-tasty snack. I think you get the idea. They're tasty just about any time. Just don't let yourself get boxed in by the traditional dos and don'ts of pretzels or you'll miss out on them.


Toasted Coconut Pretzels

Ingredients

  • 3 cups all-purpose flour
  • 1/2 cup butter, sliced
  • 1 (1/4 oz.) pkg. dry yeast
  • 1/4 cup granulated sugar,divided
  • 1/4 cup warm water
  • 1 cup whipping cream
  • 3 egg yolks, beaten
  • 1/2 teaspoon salt
  • 1
  • 1 Topping:
  • 1 egg white
  • 1 cup coconut, toasted
  • 1/2 cup brown sugar, firmly packed

Directions

  1. Place flour in large mixing bowl. Cut in butter, with a pastry blender, until mixture resembles coarse crumbs. Cover and refrigerate.
  2. Sprinkle yeast and 1 tablespoon of granulated sugar over warm water in medium mixing bowl; stir to dissolve. Let stand 5 minutes until foamy.
  3. Add cream, egg yolks, salt and remaining sugar; stir well. Pour over flour mixture and stir until flour is just moistened. Cover and refrigerate dough at least 12 hours.
  4. Punch dough down. Roll out on lightly floured surface into 16-inch square.
  5. Fold dough over into thirds. Starting on the short side, roll dough out into approximately 10x20-inch rectangle. With pizza cutter, cut 10-inch strips approximately 3/4-inch wide. Form each strip into a pretzel shape. Brush each pretzel with egg white.
  6. In small mixing bowl, combine coconut and brown sugar; gently dip pretzels into coconut mixture.
  7. Bake at 350°F for 15 to 17 minutes.
Prep Time: 15 min plus 12 hours rising Cook Time: 15-17 min Ready in:  

Recipe Source: www.ifood.tv


9/21/11

Modern Waldorf Salad


You've probably figured it out by now, but I'm kind of a total geek. I like geeky things (I'm married to an aspiring computer programmer - need I say more?) and I like to pick up quirky skills and I'm okay with that. So, as any geek that was traveling to New York City this past summer might do, I bought a book on New York City. Not just a brief overview of the major sights, though. A 384 page book about the history of New York, building by building.

Needless to say, I thought it was awesome.

I read the entire thing, even though the publisher's description of the book specifically said, "Not for cover-to-cover reading. . . " For an entire month, I was jam-packed with weird bits of New York trivia.

It's not surprising, then, that when I was in New York I was still spouting tidbits of New York info. My mother-in-law's travel agent had suggested the Waldorf-Astoria as a place to stay and of course I had to look up all the info on that historic hotel as well. So, as I was telling my patient sister-in-law about the hotel ("Did you know Cole Porter lived here? Did you know it was two hotels, the Waldorf and Astoria and they merged? Did you know the original Waldorf-Astoria was where the Empire State Building now stands?") I also mentioned it was where the Waldorf salad originated from.

That's when my sister-in-law gave me a blank look and asked what the heck a Waldorf salad was.

Really?

I thought everyone had grown up eating Waldorf salads on occasion. The combination of apples, walnuts, celery and mayonnaise is classic. Of course, when I really thought about it, the last time I made a Waldorf salad was . . . . well, never. I can't even remember the last time I even ate a Waldorf salad. Somehow it seems to have been forgotten by my generation.

Since I really like the crunchy combination of apples, walnuts and celery, I decided to make a Waldorf salad when I got back from New York. The more I thought about making the salad, the more I thought that it would be fun to make a modern Waldorf salad; a salad that hopefully would have some of that great retro appeal of the original Waldorf salad combined with flavors that are popular right now, too. This version is definitely more 2011  - it has a light citrus vinaigrette, no mayo, and some whole grain thrown in. The celery, the walnuts and the apples are still there, but they are joined by some craisins, green onions and fresh mint. The resulting salad is a light-tasting winner that can double as a side dish or light lunch. The quinoa gives it great texture, but you could substitute any favorite grain. You can serve it on top of lettuce like a traditional Waldorf salad, or just in bowls without any lettuce at all. If you like the original Waldorf salad, or even if you don't, give this salad a try new time you are looking something a little different, a little healthier, and with a bit of a modern twist.


Modern Waldorf Salad

Ingredients

  • 1 cup uncooked quinoa (or your favorite grain)
  • 2 tablespoons walnuts, toasted and chopped
  • 1 Gala or McIntosh apple
  • 1 Granny Smith apple
  • 1 celery rib, sliced thin
  • 1/4 cup packed fresh mint leaves, washed well, spun dry, and chopped (optional)
  • 1/2 cup dried sour cherries or craisins
  • 1/4 cup golden raisins
  • 2 green onions, chopped
  • 3 tablespoons seasoned rice vinegar
  • 3 tablespoons fresh orange juice
  • 1 T honey
  • 2 T vegetable oil
  • 1/2 teaspoon freshly grated orange zest
  • Salt

Directions

  1. Cook quinoa according to package directions, drain and let cool.
  2. Cut apples into 1/2-inch chunks and in a large bowl toss with quinoa, celery, mint, cherries, (or craisins) raisins and green onions.
  3. In a small bowl, whisk together rice vinegar, orange juice, honey, vegetable oil and orange zest. Add salt to taste. Toss with quinoa mixture and salt and pepper to taste. Serve.
Prep Time: 10 min Cook Time: 15 min Ready in: 25 min Serves: 6

Recipe Source: Adapted from www.epicurious.com

9/19/11

Slow Cooker Sticky Wings


The BIG football game in Utah was this past weekend. One rival is the place that gave me the education to succeed in life. The other rival is the place that currently pays for my food. 

Which team would you side with? 

Despite how much I love eating and enjoy getting a paycheck, I'd say my loyalties still lean toward my alma mater, BYU. You just can't erase the influence of your college years, and obviously I chose that school for a reason to begin with. Besides, does the success of a school's football team really determine the worth of the school? (Yes, my school lost.) 

Still, despite the fact that the two teams aren't in the same division and the game pretty much counts for nothing, (again, can you tell that BYU lost?) it was fun seeing the school pride being worn around both campuses this weekend. The bus I ride home from work goes from the University of Utah campus straight into the heart of BYU territory. Our bus driver recorded an announcement that we were the "Utah Fan Bus" and had it play every time we stopped. Since them's fighting words for a lot of the people riding the bus it was pretty funny watching people's reactions. Some people even hesitated about getting on. Cars driving around both schools had little school flags attached to their roofs and the whole town I live in basically shut down around game time. 

My husband and I watched most of the game (until the losing got too unbearable) at a sports restaurant because we don't have cable, so I didn't actually make these sticky wings to eat during the game. I did make them the next day to eat while watching a baseball game so I can still confidently say they are tested and approved as an excellent sports snack. In fact, we liked them so much that I'm not even going to bother waiting for the next sports game to make them again. You know something is great when my picky husband goes back for seconds and contemplates thirds. They're slightly sweet and slightly spicy with tender, juicy meat. The juiciness comes from slow cooking in the crockpot, and the sweet spicy flavor is enhanced with a sauce that is brushed on before broiling to give the wings great texture. No matter what side you are on in the great football rivalry in your area, (or even if you don't have a side) these wings are guaranteed to be a winner in your house.


Slow Cooker Sticky Wings

Ingredients

  • 3/4 cup packed dark brown sugar
  • 1/4 cup soy sauce
  • 1 T minced or grated fresh ginger
  • 4 garlic cloves, minced
  • 1/2 tsp cayenne pepper
  • 4 lbs whole chicken wings, (Use kitchen scissors or a sharp knife to separate wings at each joint. Discard the wingtips and cook the remaining two sections)
  • 1 Salt and pepper
  • 1 Vegetable oil spray
  • 1/4 cup water
  • 1/4 cup tomato paste

Directions

  1. Stir 1/4 cup of the sugar, 1 T soy sauce, ginger garlic and 1/4 tsp cayenne pepper into slow cooker. Season chicken with salt and pepper, add to slow cooker and toss to coat. Cover and cook until chicken is tender, about 4 hours on low.
  2. Position oven rack 10 inches from broiler element and preheat broiler. Place wire rack in aluminum foil-lined rimmed baking sheet and spray with vegetable oil spray. Transfer chicken to prepared baking sheet and discard braising liquid in the slow cooker.
  3. Combine remaining 1/2 cup sugar, 3 T soy sauce, 1/4 tsp cayenne pepper, water and tomato paste in a medium bowl. Brush the chicken with half the mixture and broil until lightly charred and crisp, about 10-15 minutes. Flip chicken over, brush with remaining mixture and broil until lightly charred and crisp on second side, about 5-10 minutes. Serve.
Prep Time: 10 min Cook Time: 4 h 30 min Ready in: 4 h 40 min Yield: 4 servings

Recipe Source: adapted from Slow Cooker Revolution


If you are interested in some other game day food, check out some of the links below from Regan at The Professional Palate:


9/16/11

Sliced Pear Dessert Pizza


Unpleasant Surprise of the Week #1: Learning that when someone slams the door shut in the middle stall of the bathroom at work, the door to the stall left of it will pop open. Wide open. And since it is one of those wheelchair accessible stalls, it may or may not be just about impossible to grab that wide door and shut it without having to get up. 

Unpleasant surprise of the week #2: Not all air poppers are made the same. Some just spew lava hot kernels instead of popped corn.

Unpleasant surprise of the week #3: Forgetting #1 and having it happen again. 

There have been some pleasant surprises. I went jean shopping and actually found jeans I like. That fit well. I'm already making plans to buy about 10 more pairs. I kind of hate finding jeans. It's more like a chore than shopping. 

The other pleasant surprise was this pizza. In fact, it was more than pleasant. It was amazing. Where-have-you-been-all-my-life-I-can't-bake-pears-any-other-way amazing. The pears are thinly sliced and layered loosely on top of pizza dough, then covered with sweetened creme fraiche, golden raisins and praline pecans. The combination of all those flavors on a pizza crust completely blows regular ol' cinnamon sugar dessert pizza out of the water. Have you had praline pecans? They alone are reason to try this pizza. The bit of sweetness and soft crunch that they add is just perfect. If you can't find any at the grocery store, you could always make your own or substitute your favorite sweetened, glazed nut. Do try to find them at your grocery store, though. And then trying to stop sneaking handfuls out of the bag in your pantry multiple times a day. The solution to this, of course, is to make another batch of this dessert pizza to use them up. 

It's a win any way you slice it. 

(Un?)pleasant surprise #3: I'm punny.


Sliced Pear Dessert Pizza

Ingredients

  • 1 batch pizza dough (enough for one 12 inch pizza)
  • 4 ounces creme fraiche (about 1/2 cup; I've never tried it, but sour cream might work as a substitute.)
  • 4 teaspoons light brown sugar
  • 2 d’anjou pears
  • 1/4 cup golden raisins
  • 1/3 cup praline pecans, very coarsely chopped

Directions

  1. Prepare the oven (or grill) for baking pizza at 500°F
  2. Combine the creme fraiche and sugar in a bowl.
  3. Core the pears and slice paper-thin (a mandolin works well for this) to help them cook quickly. You can peel them first, but I prefer to leave the skins on.
  4. Roll out the pizza dough into a 12 inch circle.
  5. Layer the pear slices on the pizza, loosely folding each slice over on itself for a more airy pizza. Add the raisins and pralines and then drizzle creme fraiche mixture over the top.
  6. Transfer to the preheated pizza stone and bake for about 12-14 minutes until the crust is crisp and the edges of the pears are browning.
Prep Time: 10 min Cook Time: 15 min Ready in: 25 min Serves: 4-6

Recipe Source: Adapted from Russ Faulk of Kalamazoo Outdoor Gourmet.


9/14/11

Pesto Potato Pasta Salad with Green Beans


I remember going to visit LA one time on a road trip in college. It was early spring and my roommates and I left some chilly, wintery weather and drove 12 hours to summer. Or at least that is what it felt like. It was so nice to feel sun on my face and not bundle up before going outside. I was born in the LA area but my parents moved to Vermont when I was just a year and half and I remember calling my mom after spending the afternoon on the beach and asking her why the heck they had ever moved. It just seemed like eternal summer was the way to go.

What I didn't realize at the time, though, was that the change of season is pretty ingrained in me. I've lived all my life in a Northern climate and come September time, I'm ready for colder weather. I want colder weather. I want a crisp breeze and leaves falling and wearing light coats in the morning.

This is the time of year that drives me crazy, then, because fall will tease me for a few days, then it will get hot, and then it will cool down again and tease me some more. I keep telling myself not to go jumping into fall activities because I really should be savoring what is left of summer. And then I try to figure out how to wear my new cardigan to work the next day without breaking a sweat walking from my computer to my lab bench.

In my mind, this salad bridges that not-quite-fall-but-not-quite-summer gap pretty well. It has potatoes, which taste like fall to me, and green beans, which highlight late summer, and a pesto sauce that I pretty much eat year round. If you're lucky enough to have grown basil and made pesto this summer, this would be the perfect way to use some that you've stored away. It's a very simple, fast recipe that makes a good end-of-the-summer-BBQ side dish or a make-ahead lunch. Go ahead and ignore your cravings for pumpkin and sweet potatoes for just one more day and enjoy the taste of fresh green beans and pesto. Winter will be here before we know it.

You know, eternal summer may not be all that bad.


Pesto Potato Pasta Salad with Green Beans

Ingredients

  • 2 waxy potatoes, scrubbed and cut into 2 inch cubes
  • 1 T salt, plus more for seasoning
  • 8 ounces cavatappi or other curly pasta
  • 8 ounces green beans, trimmed and halved
  • 1/2 cup pesto
  • 1 Pepper

Directions

  1. Place potatoes in a large pot of water; bring to a boil.
  2. Add salt and cavatappi or other short tubular pasta; return to a boil; cook 2 minutes.
  3. Add green beans. Return to a boil; cook until vegetables are tender and pasta is al dente, about 6 minutes.
  4. Drain; toss with pesto; season with salt and pepper. Serve warm or at room temperature.
Prep Time: 25 min Cook Time: 15 min Ready in: 40 minYield: 4 servings

Recipe Source: www.marthastewart.com


9/12/11

Southwestern Chicken Panini


Sometimes the original dinner plan just doesn't happen.

Sometimes I'm trying a new recipe and it turns out to be a total bomb. I usually try my hardest to salvage it into something edible, but sometimes you have to listen to the words of the immortal Kenny Rogers and know when to fold'em.

Sometimes I just don't prepare well enough. Key ingredients are still frozen or sitting at the grocery store waiting for me to buy them.

Sometimes I'm just tired.

Sometimes I question why I would have ever planned such an elaborate dinner for a worknight anyway.

Whatever the reason, sometimes you need a back up dinner plan. Or an easy meal for when you are tired. Or an easy meal so you won't be tired. Or a Something-Other-Than-Pasta dinner plan.

This Southwestern chicken panini is the latest to join the Dinners-To-Make-When-Super-Hungry, Meals-For-When-The-Original-Plan-Fails and 30-Minute-Or-Less sections of my recipe binder. It uses ingredients that I often have on hand, and is even a good way to use up leftover Italian bread that may or may not have been bought in a moment of weakness at the grocery store because it was still warm and smelled a little like heaven. It combines cooked chicken with a quick from-scratch enchilada sauce and melted cheese in a warm toasty sandwich. It's like a chicken enchilada met a grilled cheese sandwich and decided to become a quick dinner. If you don't have a panini pan, you could always toast this like a grilled cheese sandwich or even apply pressure with a spatula to get some of that panini flavor fusion going on. As the recipe is written it has a little bit of a kick, but if you like your sandwiches more spicy you can include more chipotle chilis (or chipotle chili powder) or use Pepperjack cheese instead of Moneterey Jack.

Feel free to eat it every night this week. That's the plan at our house.

Southwestern Chicken Panini

Ingredients

  • 2 cups chopped, cooked chicken breasts
  • 1 cup minced onion
  • 2 cloves garlic, minced
  • 1/4 tsp kosher salt
  • 3/4 tsp ground cumin
  • 1/2 tsp dried oregano
  • 1/2 tsp chipotle chili powder (can substitute 1 canned chipotle chile, minced, or 1 tsp regular chili powder)
  • 1/3 cup water
  • 1/2 cup tomato sauce
  • 1 tsp lime juice
  • 12 1/2 inch slices Italian bread
  • 1 1/2 cups shredded Colby or Monterey Jack cheese
  • 2 T olive oil
  • 1/4 cup chopped cilantro

Directions

  1. Heat the vegetable oil in a medium skillet over medium-high heat. Sauté onions and garlic on low until soft, about 3 minutes. Add chicken, salt, cilantro, cumin, oregano, chili powder, water and tomato sauce, and cook 4 to 5 minutes. Remove from heat. Season to taste with more salt and stir in lime juice.
  2. Preheat panini press or cast iron skillet. Brush one side of 6 bread slices with olive oil. Turn over; place about 1/2 cup filling on each. Top with 1/4 cup cheese, 2 tsp chopped cilantro and bread slices; brush top slice of bread with oil.
  3. Place sandwich(es) in panini press and cook for 3 to 5 minutes or until bread is golden and cheese is melted. If using a skillet, toast both sides until golden. Serve.
Prep Time: 15 min Cook Time: 10 min Ready in: 25 min Yield: 6 Servings

Recipe Source:  heatovento350

9/9/11

Peanut Butter and Jelly French Toast


Three things about myself that make me feel old:

1. I go to bed at 10:30 every night. Granted, I get up at 4:40, but I still feel pretty ancient when I turn in a few hours before my husband.

2. I actually like nylons. I'm not-so-secretly hoping that Mad Men and Princess Kate will bring them back in style. And I just barely found out that they were "out" only because I read an article criticizing Kate for wearing them. Until then I was blissfully enjoying how smooth they make my legs look. I still wear them. High fashion be darned.

3. I like to eat breakfast for dinner. It's pretty much the only time I'm in the mood for foods like pancakes, waffles, scrambled eggs or french toast. I still haven't succumbed to 4:00 breakfast dinners at Denny's but there are days when that doesn't sound too bad.


That's why I like to think that combining a peanut butter and jelly sandwich with french toast makes it a bit more youthful, even if I am eating it for dinner. It's probably the least elegant stuffed french toast that I know of, but don't let the simplicity make you think less of it. It combines the awesomeness of french toast with the winning sweet/salty combination of peanut butter and jelly. It tastes great with maple syrup or on its own with some fruit. It's easy and quick to make but it appeals to little kids and big kids alike.

Now, if you'l excuse me, I have some coupons I need to redeem.


Peanut Butter and Jelly French Toast

Ingredients

  • 1 cup whole milk
  • 1/2 cup heavy cream
  • 3 eggs
  • 1 teaspoon vanilla extract
  • 1 teaspoon ground cinnamon
  • 8 slices brioche (or other soft bread)
  • 1/4 cup creamy peanut butter
  • 1/4 cup fruit preserves
  • 1 T Butter, for coating pan

Directions

1. In a wide shallow dish combine milk, cream, eggs, vanilla, cinnamon and scraped vanilla bean. Spread the bread slices evenly with the peanut butter and jelly and form sandwiches.

2. Dip assembled sandwiches in batter, coating each side evenly. Heat a large cast iron or non-stick griddle over medium heat.

3. Grease pan with butter. When butter starts to sizzle, turn heat up a notch. Place sandwiches on the griddle and cook, 4 to 5 minutes on each side, until golden brown.

4. Cut into strips and serve with maple syrup.

Recipe Source: Marc Meyer, Co-Owner of Five Points, Cookshop and Hundred Acres, and ABC News


9/7/11

Peanut Butter and Jelly Tiramisu


Back in the midwest there is a restaurant chain called Culver's, a fast food/diner-type place that is known for its freshly made hamburgers and creamy custard. They are also known, to me and my husband, as the restaurant with the funniest letterboard notices. They use the boards to announce the sandwich/burger and custard flavor of the week, but never bother to put any more explanation than what the flavors are. Sometimes you drive by and they are advertising a "Mushroom and Swiss Peppermint Patty" or the next week it might be a "Grilled Reuben Strawberry Cheesecake" Mmmm. Sure makes me hungry.

In case you are thinking the same thing about this Peanut Butter and Jelly Tiramisu, let me ease your mind a bit. It is not a peanut butter and jelly sandwich on top of a creamy Italian dessert with coffee-soaked cookies. Instead, think fluffy peanut butter cream layers sandwiched between raspberries and ladyfingers brushed with raspberry jam. It's about as elegant as peanut butter and jelly gets. If you like the sweet/salty combination of peanut butter and jelly, you will like this dessert. It doesn't take long to make, but you do have to plan ahead if you want to serve it because it needs about 8 hours in the fridge for the ladyfingers to soak up the raspberry jam and become soft. With the heavy cream, cream cheese and peanut butter this is definitely a rich dessert, so despite the small pan it makes, plan on serving 8-10 people with it. 

You can go ahead and quiz them on their favorite childhood sandwiches before you decide to invite them over. 


Peanut Butter and Jelly Tiramisu

1/2 cup creamy peanut butter
8 ounces cream cheese at room temperature
1 1/4 cups confectioners' sugar, plus more for dusting
1 tsp vanilla extract
1 cup heavy cream
1/2 cup seedless raspberry jam
14 Italian-style crisp ladyfingers
4 cups raspberries
shaved chocolate, for topping

1. Beat the peanut butter, cream cheese, confectioners' sugar, vanilla extract and 1/2 cup heavy cream until smooth and fluffy, 3-4 minutes. Add the remaining 1/2 cup cream and beat until creamy, about 2 more minutes. (Do not overbeat)

2. Whisk the jam and 1/3 cup water in a small bowl until smooth. Spoon about 3 T of the jam mixture into a 9x5 loaf pan. Cover with half the ladyfingers, arranging them lengthwise. Brush with half the remaining jam mixture. (Don't worry if it looks like a lot of liquid; the ladyfingers will absorb it as the tiramisu sits.)

3. Spread half the peanut butter cream over the ladyfingers. Top with 2 cups of raspberries and the rest of the ladyfingers. Brush the ladyfingers with the remaining jam mixture and apread the remaining peanut butter cream on top. Cover with plastic wrap and refrigerate at least 8 hours.

4. Uncover the tiramisu and top with the remaining 2 cups raspberries and shaved chocolate. Dust with confectioners' sugar.

Serves: 8-10

Recipe Source: adapted slightly from the Food Network Magazine

 
Pin It button on image hover